

Post updated 5/24: Added information about repeating the process later
What is JackTrip?
The people best equipped to tell you about JackTrip are the creators at Stanford University: https://ccrma.stanford.edu/docs/common/JackTrip.html
But basically, the title is pretty apropos. JackTrip allows you to make a (relatively) direct connection between users
without the overhead of middlemen servers or special processing.
JackTrip runs on top of JACK, which stands for Jack Audio Connection Kit. What JACK does, among other things, is to
allow you to pipe audio around different software.
*Warning* For best results don’t do this with WiFi. It might work, but it might buzz a lot, and
then you have to increase the latency, which makes it less instantaneous.
Less dire warning: This post has a lot of information to understand if you’re just reading it, but I promise if you go
through and follow it step by step, you won’t have any problems. And it’s mostly repeated twice for differences between
Windows and Mac.
Table of Contents
Before you read on, even though Important Notes are at the end, I would read through them first,
ignoring things you don’t understand, but keeping in mind things you do.
- Open UDP port 4464 (if Hosting)
- Install Jack and JackTrip: Windows | Mac OSX
- Start Jack Server: Windows | Mac OSX
- Start/Connect JackTrip: Windows | Mac OSX
- Profit
- Important Notes
Get Set Up
If you’re hosting, then read this part. If you’re running the client, you can skip to “Installing Jack.” It doesn’t really matter who’s server and who’s client, but one person
has to be the server, preferably the one who knows how to forward their firewall ports.
Opening Ports and Finding Public IP: Hosts Only
JackTrip by default uses UDP port 4464 for quick communication. If you know what this means and how to get your ports
open, skip this section. If not, read on.
This is the most difficult section to write, because opening ports depends on what router, internet provider, and
operating system you have. The unfortunate thing is that this means you probably won’t be able to JackTrip behind a
school or office network.
Finding your local IP and Gateway address
You’re most likely behind a router. You’ll need to find both the local IP address of your computer and of the router.
We’re looking for IP addresses that are in the range of
192.168.0.0to192.168.255.255172.16.0.0to172.31.255.25510.0.0.0to10.255.255.255
Yours is most likely in the first range.
I’m giving you two different ways to check on each OS. If you’ve never used cmd or terminal before, I suggest you
try it.
| Method | Windows | Mac |
| Cmd/Terminal | Right-click on the start menu (or press Win-X) and click on “Command Prompt”. In thewindow that pops up, type ipconfig and press enter.
Look for the longest section, and look for IPv4 Address and Default Gateway. Write those down. |
In spotlight search (the search icon in the top right) type Terminal and press enter.In the window that appears, type IP: ifconfig | grep inet and press enter.Look for “inet 192.168.X.X” Gateway: in the Terminal, type |
| GUI | On the bottom menu bar, right click the network icon (either a WiFi symbol or a connected monitor symbol), and click on “Open Network & Settings”. Then click on “View your network properties” and look for “IPv4 address” and “Default gateway”. |
Click on the WiFi icon in the top bar, click “Advanced” near the bottom, then click on “TCP/IP” tab. Write down “IPv4 Address” and “Router”. |
For reference, IPv4 addresses are most commonly 192.168.X.X. The router or default gateway (same thing) usually
occupies a low address in this range, so 192.168.1.1 or something, whereas your computer’s local IP might be
something like 192.168.1.135.
Accessing the Router Administration Interface
If you’ve never logged into your router’s administration panel, this is a good time to try it. Go to your browser
and type in the router address into the address bar and press enter. With any luck, you’ll be greeted with a log-in.
A sure bet is user: admin, pass: admin, but you might look on the sticker of your router
to see if the credentials are there.
To find the page where we can open/forward ports, you should look for menus that are something like:
Network -> Security/Firewall -> Port Forwarding
In the Port Forwarding section, you will be able to open ports – you tell it what protocol to use: TCP, UDP, or both
– in this case UDP, what port number – in this case 4464, and the computer to forward it to – in this case, they
usually have a dropdown list, so look for your IP address that we found in the previous part. Apply the changes, and
we should be good to go.
I’ve consolidated a list of guides for different ISPs and routers, in case you need more specific guidance:
Google Fiber: https://support.google.com/fiber/answer/4650342
AT&T Uverse: https://www.att.com/support/article/u-verse-high-speed-internet/KM1123072/
Xfinity: https://www.xfinity.com/support/articles/port-forwarding-xfinity-wireless-gateway
Linksys Routers: https://www.linksys.com/us/support-article?articleNum=136711
Netgear: https://kb.netgear.com/24290/How-do-I-add-a-custom-port-forwarding-service-on-my-Nighthawk-router
In general, you can Google “port forwarding” and then your device or ISP.
Public IP
Go to https://api.ipify.org/ in your
browser and copy down the address. This is what you will give your clients for them to connect to you.
From here, go to the section for your operating system: Windows | Mac OSX
Windows
You can follow this guide: https://ccrma.stanford.edu/software/jacktrip/windows/index.html
but I couldn’t get it to work using Jack Control, so I’ve written what worked for me.
Helpful Prereq: Install ASIO4ALL
Download and install from here: http://www.asio4all.org/
Install JACK2
- Download the JACK2 installer: https://jackaudio.org/downloads/#windows
- Select the correct bit version. To check, in your start menu type “System
Information”, and then look for the entry “System Type” – if it says x64, then I would install both
the 32 bit and 64 bit versions. If it says x86, then you can only install the 32 bit version.
- Select the correct bit version. To check, in your start menu type “System
- Double click the downloaded file to install JACK2.
- Reboot computer if it asks after installation.
Install JackTrip
- Download the JackTrip: https://ccrma.stanford.edu/software/jacktrip/windows/Jack_v1.9.10_64_setup.exe
- Double click to install, and use default settings.
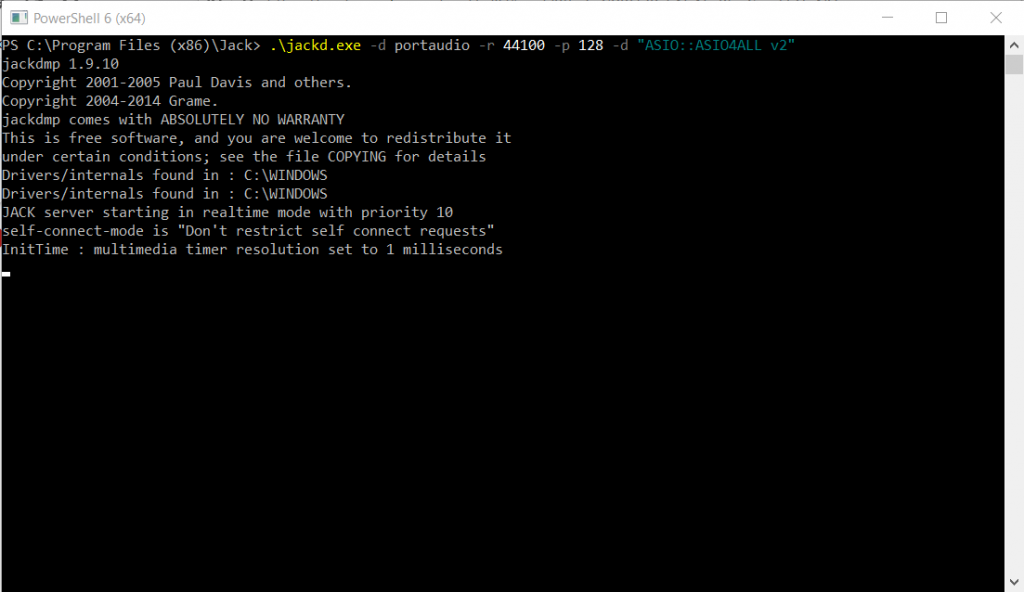
Start JACK Server
Here’s where I differ from the previously referenced page. We’re going to run the server from the command line.
- Right-click on the start menu (or press
Win-X) and click on “Command Prompt”. - If you installed the 64-bit version earlier, type
cd 'C:\Program Files (x86)\Jack\', otherwise,
typecd 'C:\Program Files\Jack\'.cdis a command that stands for “change
directory.” - Then, type
.\jackd.exe -d portaudio -r 44100 -p 128 -d "ASIO::ASIO4ALL v2"and press enter.
You will then see a bunch of output, but if it doesn’t say “Failed to start Jack” or something along those lines,
then you are good to continue. This is what my window looks like:
Check that your audio devices are correct in ASIO4All
- Find the notification area:
- Click on the ASIO4ALL icon (if you followed the above command, it should say “128 Samples @44100 Hz”
instead):
- Make sure the devices that you want to use are selected. I want to use Realtek HD Audio, so it is selected.
Adjust as appropriate. I also moved the slider on the bottom to where the blue line is to correspond with
the 128 samples we choose.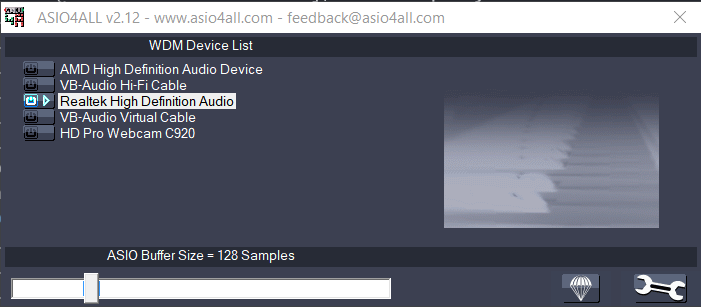 Note that, if you switch audio
devices, you might have to close the window and restart JACK. To do that, go to your command window and type
Ctrl C(as if you were copying something) which will stop the Jack server.
Then do the previous section over. Another pro-tip is that you can press theUp Arrow Key
repetitively to cycle through your previous commands, so you don’t have to retype it. Just press enter.
Run JackTrip
- Open another command window, as above (don’t close that one).
- This time, ‘cd’ to the JackTrip installation location. So for mine, it would be
cd C:\Users\USERNAME\jacktrip1.2where USERNAME is my username, and the 1.2 after jacktrip
could be different in the future. A pro-tip is just to type all the way up until “jacktrip” and then
press the Tab key; the command line will auto-complete the folder name for you.
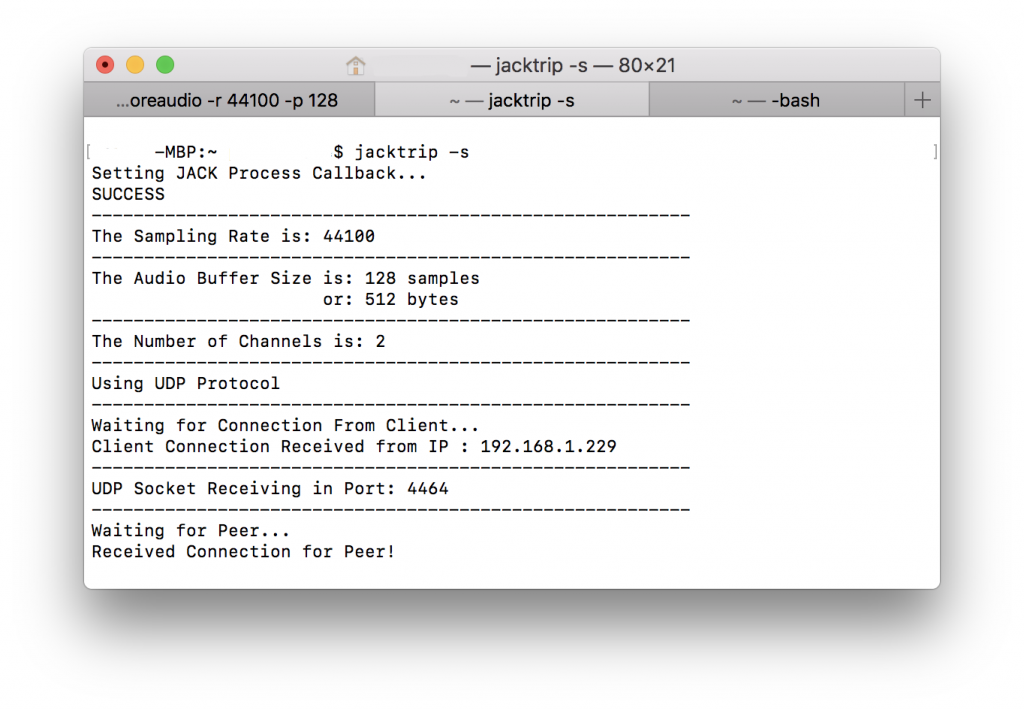
For Hosts (must run this first before client):
- Type
.\jacktrip.exe -s
This is what mine looks like: 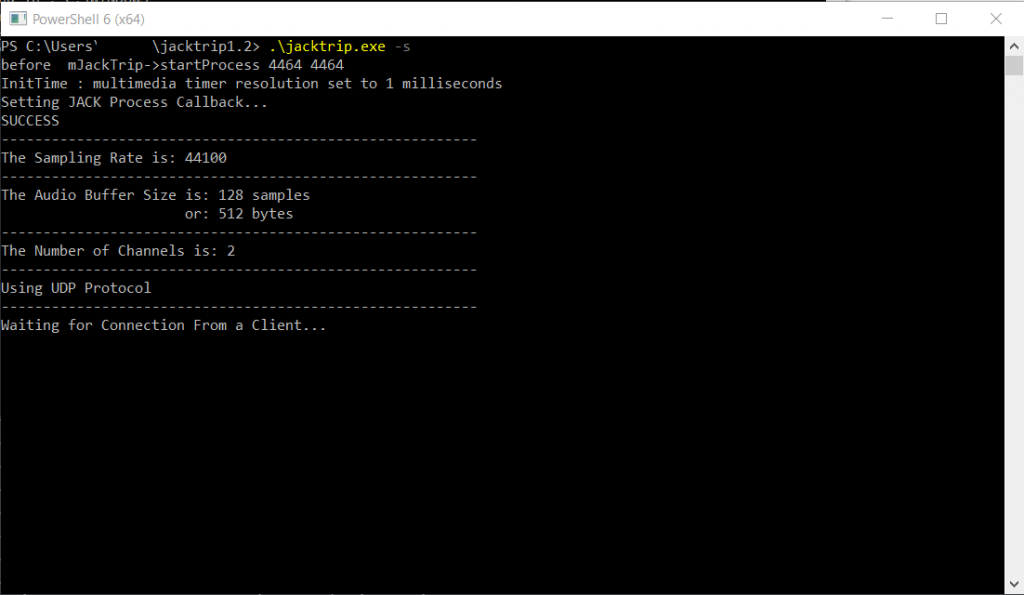
When the client successfully connects, you’ll see this:
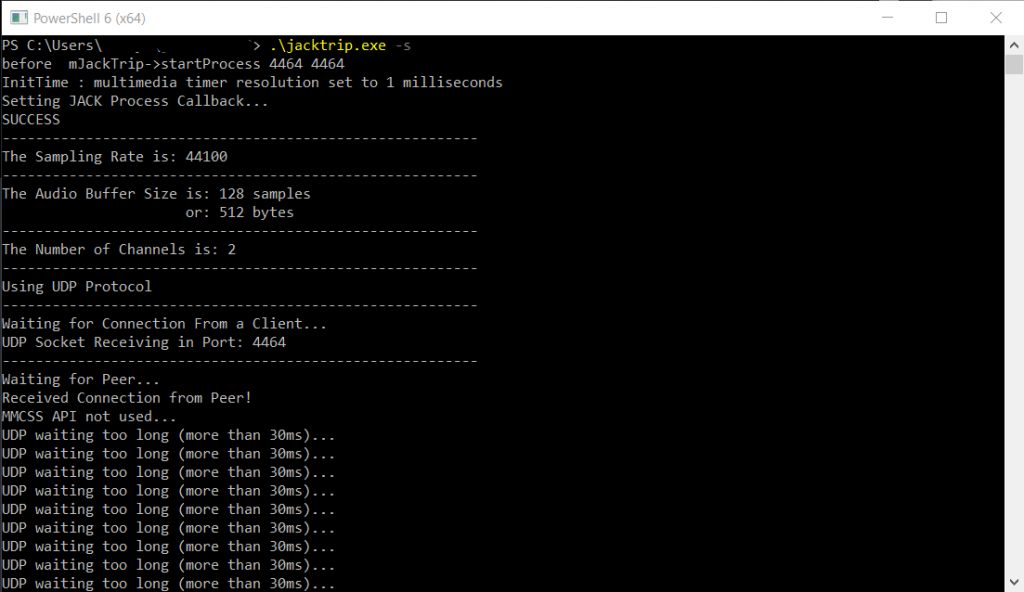
Because I’m bad and a hypocrite, I used WiFi… so you see the UDP waiting too long warnings. No worries, it
works.
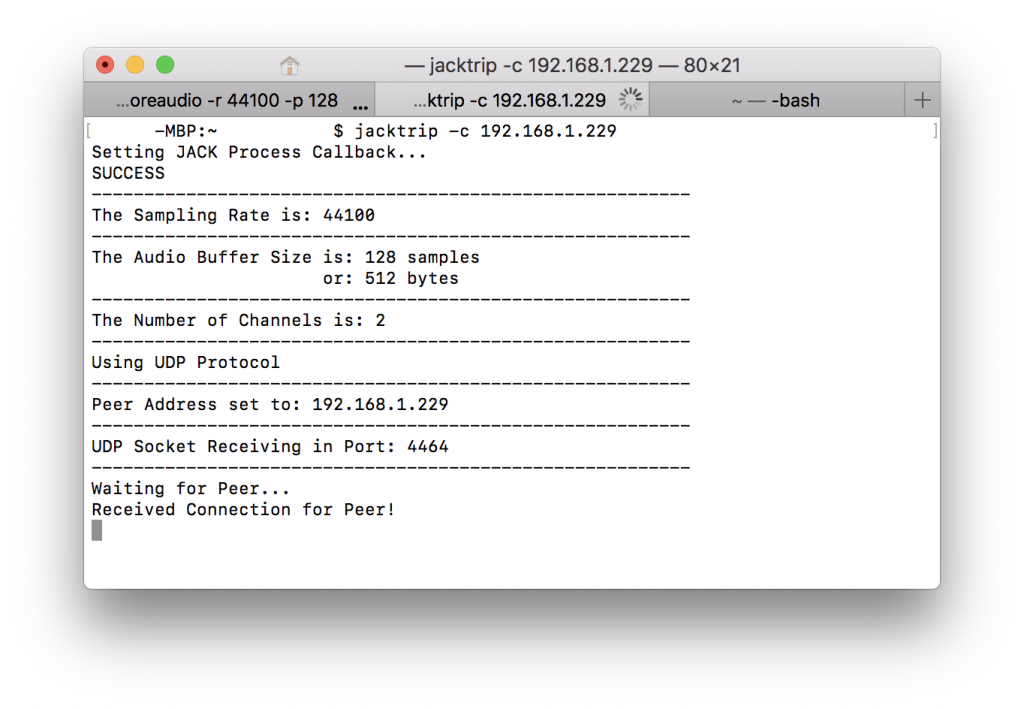
For Clients (must wait for host to run first):
- Type
.\jacktrip.exe -c IP_ADDRESS
IP_ADDRESS is what your host will give you (the one the he or she should have looked up if they followed the Open Ports section. Note that I am using a local IP address because I’m connecting
within my network for demo purposes, but the number you put in will most definitely NOT be 192.168.X.X. You
should see a bunch of stuff, but important to see is “Received Connection for Peer!”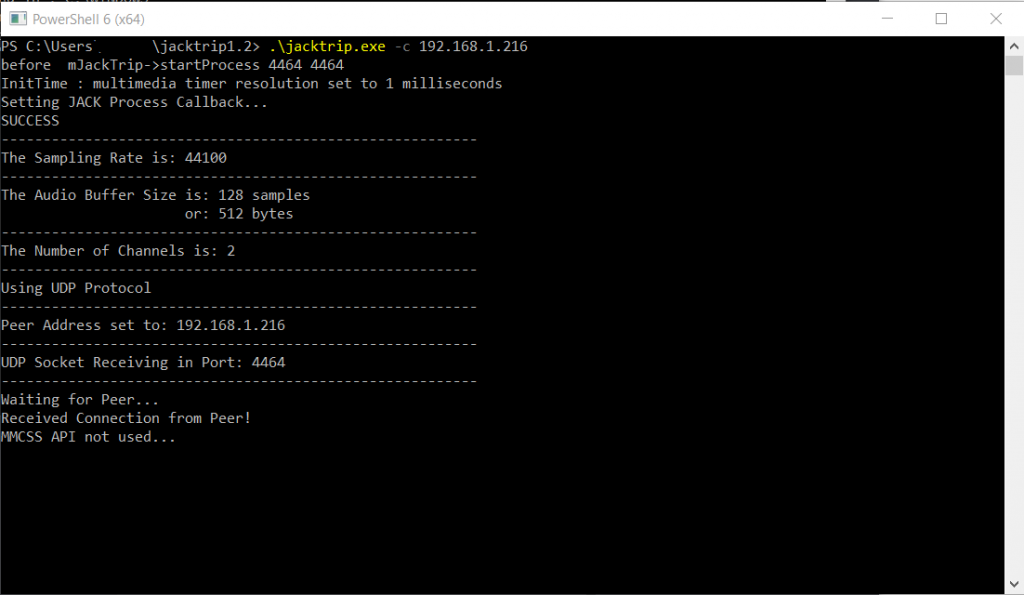
At this point, you should be all connected and ready to do virtually-lagless audio communication! From here, see
the Notes section for tips and warnings. Once you’re done with your jam sesh, stop
everything by going to each command window and pressing Ctrl C (as if you were copying something).
This kills the process, and you can close the windows.
Mac OSX
You can follow this guide: https://ccrma.stanford.edu/software/jacktrip/osx/index.html
but I couldn’t get it to work using Jack Control, so I’ve written what worked for me.
Install JACK2
- Download the JACK2 installer: https://jackaudio.org/downloads/#os-x
- Download the JACK2 Binaries link (JackOSX 0.92_b3 as of this writing).
- Because of some Mac OSX security thing, you have to install this by going to Finder, the downloads
folder, Ctrl-click on the .pkg file, and then click “Open”. Then you can install it. - Reboot computer if it asks after installation.
Install JackTrip
- Download the JackTrip: https://ccrma.stanford.edu/software/jacktrip/osx/JackTrip.pkg
- Same as above, go to downloads folder in Finder, Ctrl-click and click “Open”.
- Shouldn’t need to reboot, but do it if it asks.
Start JACK Server
Here’s where I differ from the previously referenced page. We’re going to run the server from the command
line.
- Open Terminal. If you don’t know where to find it, go to Spotlight search (search icon on the top bar)
and type “Terminal”, then Enter. - A little user-interface change I like to do is enable visible tab bar on Terminal: On the top click on
View -> Show tab bar. - Go back to the Terminal window and type
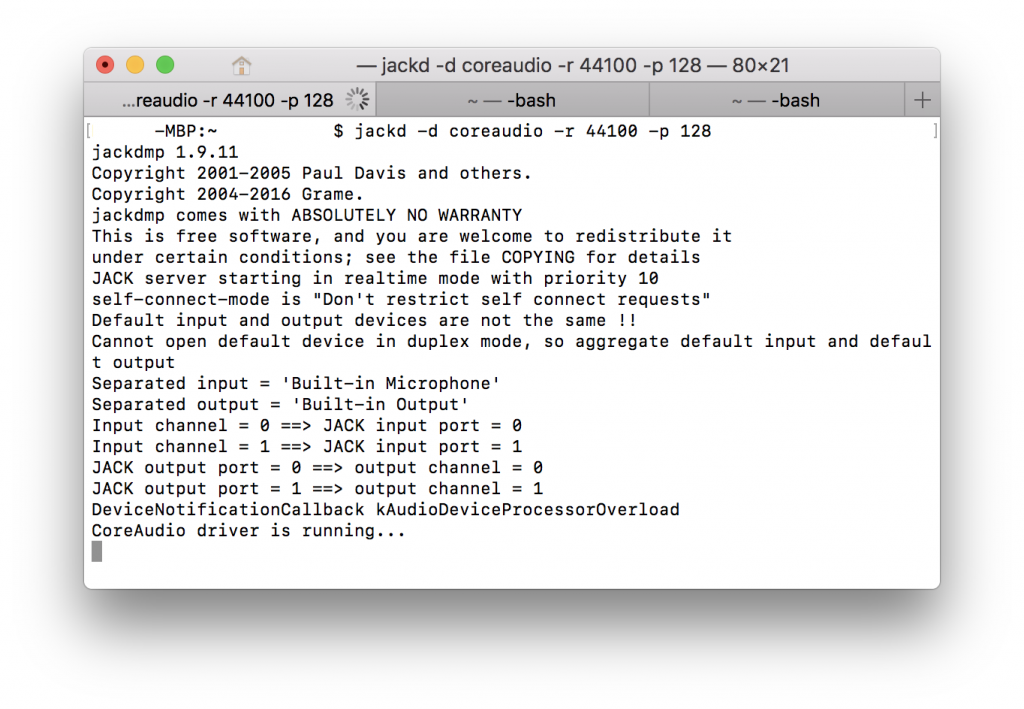
jackd -d coreaudio -r 44100 -p 128and press enter.
You will then see a bunch of output, but if it doesn’t say “Failed to start Jack” or something along those
lines, then you are good to continue. This is what my window looks like:
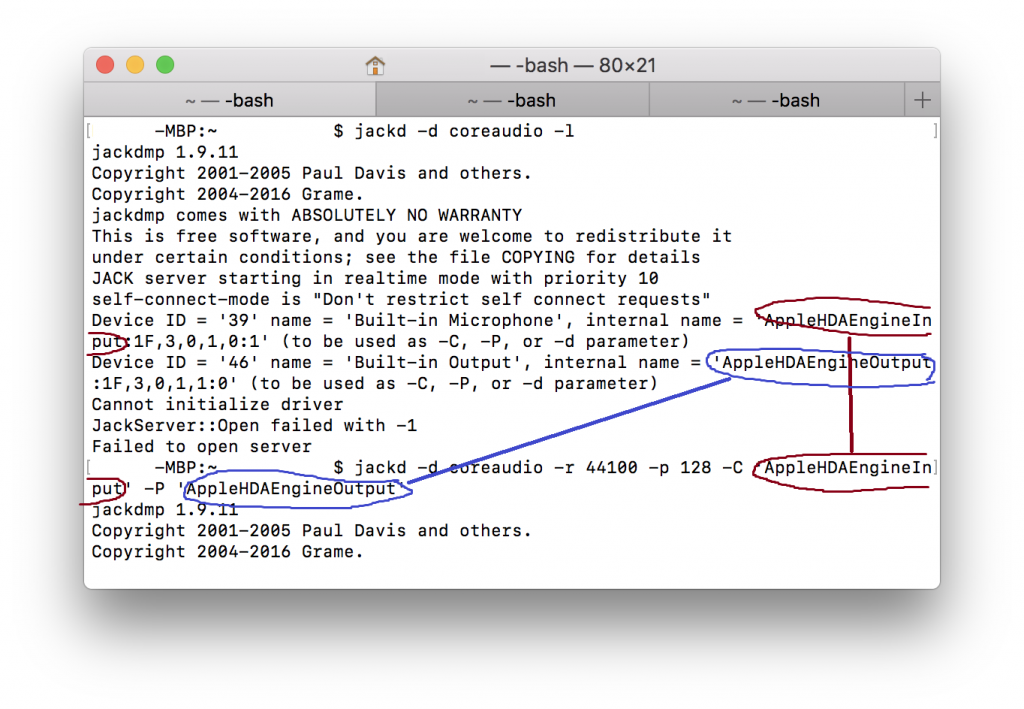
[Optional] If you want to use non-default devices, you’ll have to specify them with -C and -P at the end. To
show what devices exist, use jackd -d coreaudio -l. You’ll see for each entry something that says
“internal name.” Don’t worry about the “Failed to open server” because in this case that’s what we wanted – just
to list the devices but not start the server. Now that we know the internal names of the devices, we can put the
input after -C, and output after -P:
jackd -d coreaudio -r 44100 -p 128 -C "InputDeviceName" -P "OutputDeviceName"
See the next image for sample of what I have.
Run JackTrip
- In Terminal, open a new Tab either by Ctrl-T or clicking the plus in the tab bar.
- Type
jacktrip.exe -s - Type
jacktrip.exe -c IP_ADDRESS
For Hosts (must run this first before client):
This is what mine looks like: 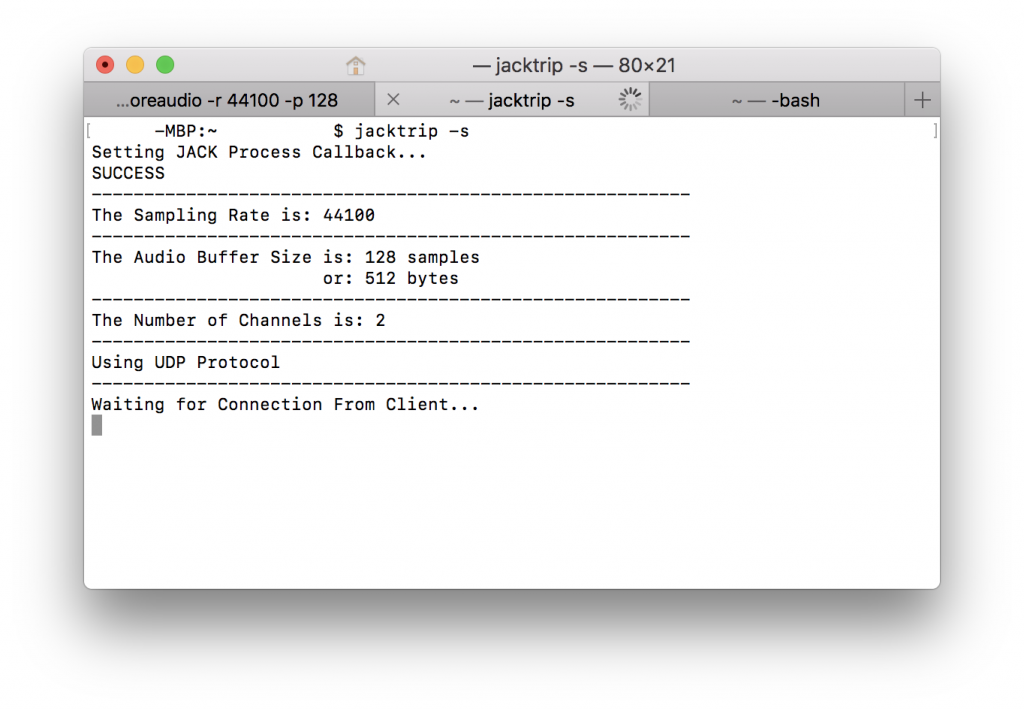
When the client successfully connects, you’ll see this:
You might see UDP waiting too long warnings. No worries, it works.
For Clients (must wait for host to run first):
IP_ADDRESS is what your host will give you (the one the he or she should have looked up if they followed the
Open Ports section. Note that I am using a local IP address because I’m connecting
within my network for demo purposes, but the number you put in will most definitely NOT be 192.168.X.X. You
should see a bunch of stuff, but important to see is “Received Connection for Peer!”
At this point, you should be all connected and ready to do virtually-lagless audio communication! From here,
see the Notes section for tips and warnings. Once you’re done with your jam sesh, stop
everything by going to each command window and pressing Ctrl C (as if you were
copying something). This kills the process, and you can close the windows.
Notes
-
I don’t think it needs to be said, but I’ll mention it anyways: after you’ve got it working once,
all you need to do for the next time is to run JACK and JackTrip – no need to reinstall everything. -
All parties must use the same sample rate (-r) and buffer size (-p) parameters, or else JackTrip
will fail to connect!! -
Use headphones! Because there isn’t any sound processing, there’s no noise- or echo-cancellation.
Using it without headphones, however, is a good way to see how good the latency is, since you can
hear your own echo from the other person’s speakers. -
Ctrl Con both Windows and Mac stops the program. Sometimes, you need to spam it. If
one person doesCtrl Con their Jack Server, everything will start buzzing, so just
mashCtrl Cwhen you hear incessant buzzing. -
To save your sanity, most command lines have some nice features:
- Pressing
Arrow Up Keygoes back in time through your command history. So, if
you want to edit your previous command, press Up, and then start deleting/typing.
Arrow Down Keygoes forward in time, up until the current time, duh. - If you’re not quite sure if you’re typing the correct path to some folder or file, you can
always press Tab to cycle through auto-complete. For example, in the Windows example, you
can typecd C:\Progrand then press Tab, and it should automatically fill in
cd 'C:\Program Files\'
- Pressing
- I chose the jackd parameters from experience; a 128 buffer size had latency that was barely
perceptible. If you can sort of hear the other person, but there’s quite a bit of buzzing noise on
top of it, then you might need to increase your latency. In the jackd command, instead of
-r 44100 -p 128try-r 44100 -p 256. Then restart JackTrip as well. Again,
all parties involved need to be using the same -r (sample rate) and -p (buffer size). - DON’T USE WIFI. Locally, with Betty’s Macbook on WiFi, and my computer on ethernet, we could do -p
256, but the latency isn’t as good, and you won’t have as good of an experience. -
On Windows, you might run into an error starting up certain audio programs after you
install JACK2.There’s some critical bug that hasn’t been fixed. For example, my Sibelius
software crashed upon opening every time. There is a workaround, and involves disabling Address
Space Layout Randomization. It’s a small security decrease, but it’ll prevent your audio
applications from crashing. If you want to read about the bug, go here: https://github.com/jackaudio/jack2/issues/332. Otherwise, to fix
it:- Go to your start menu, and type “Windows Security” and launch the app.
- Then go to “App & browser control” and then scroll down to “Exploit Protection”. Click on
“Exploit protection settings”. -
Go down to to “Randomized memory allocations (Bottom-up ASLR)” and change it to “Off by
default”. - You might have to restart. Everything should work now.
-
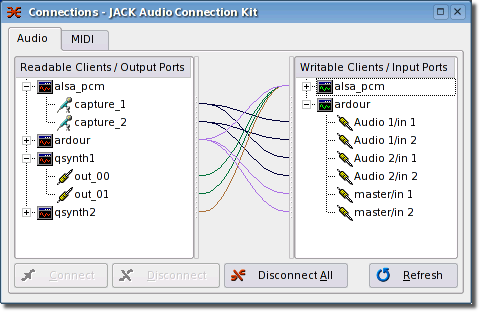
In case you want to pipe audio around to, for example, record all the audio streams, the easiest way
would be to use qjackctl (type in Spotlight or Windows Start Menu – the program is called Jack
Control, but qjackctl also brings it up) after you’ve connected JackTrip between host and clients
and opened up whatever software you need to use (OBS, Reaper, etc.). Click on the “Connect” button,
and you’ll see the connections window. You can drag inputs from the left side to outputs on the
right side. This will require some experimentation on your part, because I won’t be able to cover
all the cases. Here’s an image from QJackCtl’s screenshot page:
Hopefully this has been helpful. It’s a lot to parse if you’re just reading it, but I promise if you go
through and follow it step by step, you won’t have any problems. I hope this can allow many more
musicians to collaborate, especially realtime, because, let’s face it, syncing audio and video or
recording with yourself is fun and all, but it’s a pain in the butt. Happy Music Making!
If you found this post helpful, please consider donating! https://www.paypal.me/seanchenpiano