As you might know, I have two kids now, so much of my musical life revolves around nursery tunes and unfortunate earworms from shows like Daniel Tiger and other viral videos like Baby Shark, although I’d like to give a shout out to Bluey for great music that often incorporates or references classical pieces.
As I was noodling around with “Twinkle twinkle,” I discovered a cool chromatic sequence you can put under the final twinkle statement that conveniently is easy to play on the guitar (just slide down in one barred position), but also sounds pretty cool and jazzy. And we all know a classical pianist’s dream is to sound jazzy.
I wanted to explore from my own viewpoint, unadulterated by formal jazz studies, why this progression works, how we can get there from a “classical” idiom, and maybe even some experiments with even weirder extensions. Keep in mind, I didn’t necessarily consciously take this path to arrive at the progression, but in writing this out, I’m trying to articulate what perhaps goes on subliminally in the ear or fingers.
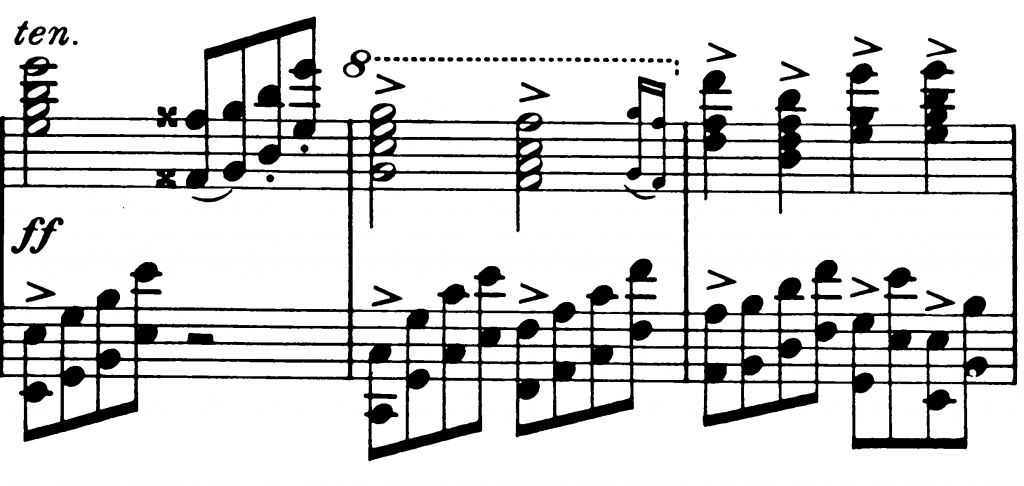
So let’s start with the end result:
My goal with this was to do a almost fully chromatic line going all the way to the second to last measure, where we do have to jump to the cadence. I did cheat a bit with that dotted note in the base, because otherwise it would be sort of odd. I also think my preference would be to break the chromatic scale starting “how I wonder…” but I had a chromatic agenda here. But, I think it’s cool you can just descend chromatically under the melody and it works!
But first…
II – V – I
Here are some examples of II – V – I progressions.
I think it’s hard to overstate how important a pre-dominant/dominant/tonic motion is, even if it’s on a secondary key. We feel the V – I strongly, but that pre-dominant chord has a lot of harmonic possibilities – A pre-dominant chord can be a ii, IV, V/V; it can be a minor, a major, a minor 7th, a major 7th, a diminished 7th, a half-diminished 7th, and on and on as you stack more 3rds. Importantly, it can also be a Neapolitan or an augmented 6th chord, which you can actually think of as chromatic versions of stacked thirds on top of the ii chord.
The useful thing is that you can II – V – I your way onto practically any chord (I haven’t transcribed it or seen a score, but to me that is how Giant Steps works). I’ve put a short snippet below of just random II – V – I motions (and… uh some that aren’t because I got lost), and it sounds completely fine even though I’m jumping to so many different chords.
Okay, so let’s take a detour.
Pachelbel’s Canon
Ah, yes. We all know this, and we all know it’s maybe related to the circle of fifths. Well, actually, is it? I mean, it has fifth motions (going down a fourth = going up a fifth), but it also moves up a step every other time, right? I think it’s more of moving down a third every two chords, with the in-between chords giving you step-wise (deceptive) cadences. I think this pattern is actually called a romanesca.
But, we can actually maybe turn this progression into a legitimate circle of fifths. Let’s strip it down to the movement by a third I mentioned before, and… let’s edit the last measure so it’s a II not a IV (in D major, instead of G major, we will use e minor).
Now, taking what we figured out in the previous section, let’s just put II – V – I, ending on the four chords we’ve picked out. Just to walk through an example, going into the second measure, we need to arrive at b minor. A ii – V – i cadence would be something like C♯ø7 – F♯ – b.
We can actually make it back to the tonic without breaking the pattern (with a little creative chromaticism).
Has a sort of K-pop feel to it, I think (well, because I used lots of 7ths).
What if we kept going? Another crucial point to realize is that the II – V – I motion puts you down a step. Since we were moving by thirds (two steps) at the most sparse version, and we’ve added one II – V – I before each chord, occupying one step, that leaves us with one more step. Why don’t we make that other step a II – V – I as well?
Okay, so this maybe doesn’t sound as great, but I think with a bit more finessing, could work fine. But, hey! We now legitimately have circle of fifths motion in the bass the whole way through (albeit chromatic and with some slight of hand at the end).
Tritone Substitutions
One thing jazz-wannabe classical pianists learn quite early is TRITONE SUBSTITUTIONS. When you first start off it’s just sort of like, hrm sometimes if I play the chord a tritone away from the original chord, it sounds kind of cool and jazzy. In the following example, the G turns into a Db.
Upon thinking about it some more, it seems to work the best on V – I cadences, because then it turns into ♭ii – I, which is just sliding down a half-step. Something Phrygian about it. So, let’s substitute every “V” in our II – V – I sequences with its tritone version, which sometimes just involves moving the bass note down. With some of them, since we’re already moving by half-steps, it doesn’t work, but we really are able to make it move down chromatically.
Back to Twinkle
So you can actually put circle of fifths under a big chunk of “Twinkle twinkle.” Starting at “Like a diamond in the sky,” you can do circle of fifths alllll the way to the end of the piece:
Well…. now that we have the fifths, we can just tritone substitute to our heart’s content and get the chromatic version we want. Yay!
You know, I think a good mix of fifths and tritone-subs is the way to go. Otherwise it’s too uniform, and if everything is spicy, nothing is spicy. I’ll leave that as an exercise for the reader =).
And Beyond
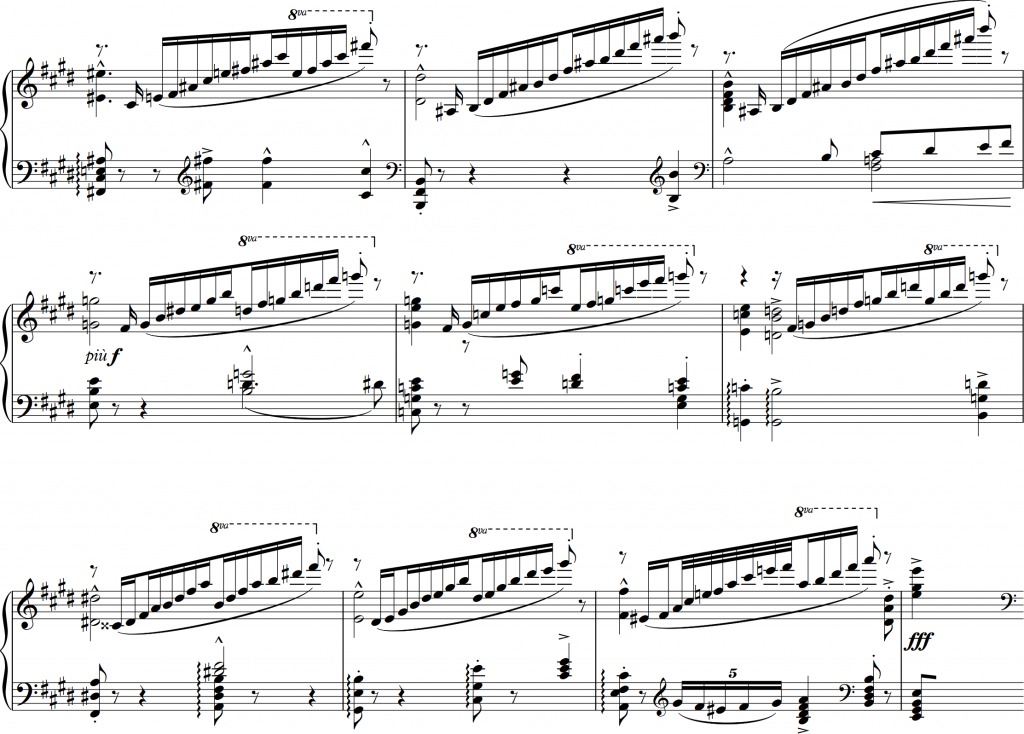
I was thinking, sometimes we have those half-steps already and we can’t really do a tritone substitution there. What if… to move between the half-steps we use quarter-tones? To be honest, I’m not a huge fan of how it sounds, but it’s definitely interesting, so I leave it here for you to react to. I had to put the quarter-toned pitches on a separate staff because pitch bends apply to the whole instrument, and because of the way the playback works, blah blah blah.
I dunno, maybe has potential? Might have to make some of the other notes in the chords quarter-toned, too.
Semi-Related Thoughts
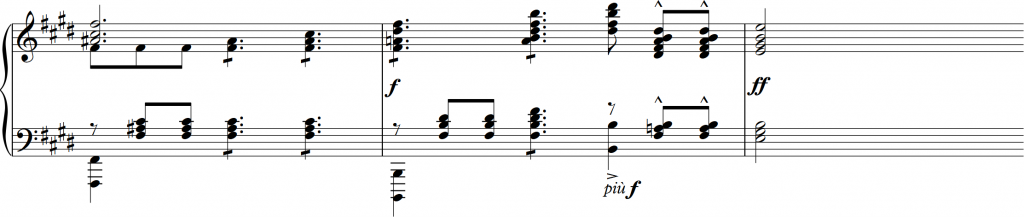
I like to sing along and harmonize to tunes. I’ve realized that the Schumann/Beethoven “An die ferne geliebte” melody works very well as a counter-melody in many cadences:
If you don’t know the Dohnanyi Nursery Rhyme Variations, I urge you to listen to it. I think it’s a very colorful piece with lots of musical references. At first, it has a pastiche-y feel about it, but I think by the end, you come away feeling that it really is sincere, albeit fun and humorous, music.
If any of you are theorists or jazz experts, and want to chime in on anything about this, please do in the comments! I’d love to hear and learn more about different perspectives on harmony.
EDIT: I had a misconfiguration that bit me in the ass recently (along with blindly updating Go to 1.17). Code below is updated.
I recently decided to try Caddy v2 for my personal home server, and had such a good and easy time with it that I decided to migrate my website server to Caddy from NGINX. NGINX was doing just fine, fast, and stable. But with the recent addition of a Cloudflare proxy and stuff, I didn’t want to have to deal with certbot and manually dealing with a DNS challenge. And, the prospect of having sane preconfigured behaviors was quite nice, since now with two daughters, I have less and less time to tinker with things like this.
That, and I (with the help of my brothers) had setup NGINX probably five years ago now, and though I still feel like I’m hacking stuff together, back then, it really was quite hacky, so who knows how much bad config was in my NGINX conf file. So if any of you are seasoned webserver sysadmins and are thinking, “what the hell is this config?” I apologize. If you see something egregious or any security vulnerabilities, please shoot me a message/leave a comment and educate me!
So… since I’m on a trip for a concert, I have some time to get this done. I’m happy how easy Caddy is to configure, and you don’t need to write as many lines to config things because it assumes (correctly in my case) defaults for most people running webservers and reverse proxies. Docs are very clear, though getting your intuition from an Apache or NGINX based config to the Caddyfile can be a bit tough.
I’m most impressed with the automatic tls and configuring the wordpress site. Instead of all the certbot stuff and having to run a certbot in systemd or something similar, you can use caddy. I did have a bit of trouble finding how to easily add the DNS challenge plugin, and finally found in the CLI caddy add-package [plugin-package-github-url] so you can add the cloudflare DNS plugin that way. For .php sites, instead of doing all that try_files and fast_cgi stuff, you can just call php_fastcgi directive, and the defaults all work for hosting a wordpress site (and, most .php sites from what I understand). If you need to configure anything, that is all possible.
I’m also in the process of updating a lot of stuff, so these configs will change (haha why is my node code served from /root…?). I also have some redirects that are made in the node express server… Again, why? Who knows. But I’ll clean that up in the future.
Anyways, compare for yourself. They’re not 100% equivalent since I keep messing around with it, and stopped using the hasura container for now, but at least to the end user, everything seems to work as before the change. But, ~160 lines to ~80 lines, around a 50% reduction! YMMV.
But basically, the title is pretty apropos. JackTrip allows you to make a (relatively) direct connection between users
without the overhead of middlemen servers or special processing.
JackTrip runs on top of JACK, which stands for Jack Audio Connection Kit. What JACK does, among other things, is to
allow you to pipe audio around different software.
*Warning* For best results don’t do this with WiFi. It might work, but it might buzz a lot, and
then you have to increase the latency, which makes it less instantaneous.
Less dire warning: This post has a lot of information to understand if you’re just reading it, but I promise if you go
through and follow it step by step, you won’t have any problems. And it’s mostly repeated twice for differences between
Windows and Mac.
Table of Contents
Before you read on, even though Important Notes are at the end, I would read through them first,
ignoring things you don’t understand, but keeping in mind things you do.
If you’re hosting, then read this part. If you’re running the client, you can skip to “Installing Jack.” It doesn’t really matter who’s server and who’s client, but one person
has to be the server, preferably the one who knows how to forward their firewall ports.
Opening Ports and Finding Public IP: Hosts Only
JackTrip by default uses UDP port 4464 for quick communication. If you know what this means and how to get your ports
open, skip this section. If not, read on.
This is the most difficult section to write, because opening ports depends on what router, internet provider, and
operating system you have. The unfortunate thing is that this means you probably won’t be able to JackTrip behind a
school or office network.
Finding your local IP and Gateway address
You’re most likely behind a router. You’ll need to find both the local IP address of your computer and of the router.
We’re looking for IP addresses that are in the range of
192.168.0.0 to 192.168.255.255
172.16.0.0 to 172.31.255.255
10.0.0.0 to 10.255.255.255
Yours is most likely in the first range.
I’m giving you two different ways to check on each OS. If you’ve never used cmd or terminal before, I suggest you
try it.
Method
Windows
Mac
Cmd/Terminal
Right-click on the start menu (or press Win-X) and click on “Command Prompt”. In the
window that pops up, type ipconfig and press enter.
Look for the longest section, and look for IPv4 Address and Default Gateway. Write those down.
In spotlight search (the search icon in the top right) type Terminal and press enter.
In the window that appears, type IP: ifconfig | grep inet and press enter.
Look for “inet 192.168.X.X”
Gateway: in the Terminal, type netstat -r | grep default and Enter
GUI
On the bottom menu bar, right click the network icon (either a WiFi symbol or a connected monitor
symbol), and click on “Open Network & Settings”. Then click on “View your network properties”
and look for “IPv4 address” and “Default gateway”.
Click on the WiFi icon in the top bar, click “Advanced” near the bottom, then click on “TCP/IP” tab.
Write down “IPv4 Address” and “Router”.
For reference, IPv4 addresses are most commonly 192.168.X.X. The router or default gateway (same thing) usually
occupies a low address in this range, so 192.168.1.1 or something, whereas your computer’s local IP might be
something like 192.168.1.135.
Accessing the Router Administration Interface
If you’ve never logged into your router’s administration panel, this is a good time to try it. Go to your browser
and type in the router address into the address bar and press enter. With any luck, you’ll be greeted with a log-in.
A sure bet is user: admin, pass: admin, but you might look on the sticker of your router
to see if the credentials are there.
To find the page where we can open/forward ports, you should look for menus that are something like:
Network -> Security/Firewall -> Port Forwarding
In the Port Forwarding section, you will be able to open ports – you tell it what protocol to use: TCP, UDP, or both
– in this case UDP, what port number – in this case 4464, and the computer to forward it to – in this case, they
usually have a dropdown list, so look for your IP address that we found in the previous part. Apply the changes, and
we should be good to go.
I’ve consolidated a list of guides for different ISPs and routers, in case you need more specific guidance:
Select the correct bit version. To check, in your start menu type “System
Information”, and then look for the entry “System Type” – if it says x64, then I would install both
the 32 bit and 64 bit versions. If it says x86, then you can only install the 32 bit version.
Double click the downloaded file to install JACK2.
Double click to install, and use default settings.
Start JACK Server
Here’s where I differ from the previously referenced page. We’re going to run the server from the command line.
Right-click on the start menu (or press Win-X) and click on “Command Prompt”.
If you installed the 64-bit version earlier, type cd 'C:\Program Files (x86)\Jack\', otherwise,
type cd 'C:\Program Files\Jack\'. cd is a command that stands for “change
directory.”
Then, type .\jackd.exe -d portaudio -r 44100 -p 128 -d "ASIO::ASIO4ALL v2" and press enter.
You will then see a bunch of output, but if it doesn’t say “Failed to start Jack” or something along those lines,
then you are good to continue. This is what my window looks like:
Check that your audio devices are correct in ASIO4All
Find the notification area:
Click on the ASIO4ALL icon (if you followed the above command, it should say “128 Samples @44100 Hz”
instead):
Make sure the devices that you want to use are selected. I want to use Realtek HD Audio, so it is selected.
Adjust as appropriate. I also moved the slider on the bottom to where the blue line is to correspond with
the 128 samples we choose. Note that, if you switch audio
devices, you might have to close the window and restart JACK. To do that, go to your command window and type Ctrl C (as if you were copying something) which will stop the Jack server.
Then do the previous section over. Another pro-tip is that you can press the Up Arrow Key
repetitively to cycle through your previous commands, so you don’t have to retype it. Just press enter.
Run JackTrip
Open another command window, as above (don’t close that one).
This time, ‘cd’ to the JackTrip installation location. So for mine, it would be cd C:\Users\USERNAME\jacktrip1.2 where USERNAME is my username, and the 1.2 after jacktrip
could be different in the future. A pro-tip is just to type all the way up until “jacktrip” and then
press the Tab key; the command line will auto-complete the folder name for you.
For Hosts (must run this first before client):
Type .\jacktrip.exe -s
This is what mine looks like:
When the client successfully connects, you’ll see this:
Because I’m bad and a hypocrite, I used WiFi… so you see the UDP waiting too long warnings. No worries, it
works.
For Clients (must wait for host to run first):
Type .\jacktrip.exe -c IP_ADDRESS
IP_ADDRESS is what your host will give you (the one the he or she should have looked up if they followed the Open Ports section. Note that I am using a local IP address because I’m connecting
within my network for demo purposes, but the number you put in will most definitely NOT be 192.168.X.X. You
should see a bunch of stuff, but important to see is “Received Connection for Peer!”
At this point, you should be all connected and ready to do virtually-lagless audio communication! From here, see
the Notes section for tips and warnings. Once you’re done with your jam sesh, stop
everything by going to each command window and pressing Ctrl C (as if you were copying something).
This kills the process, and you can close the windows.
Download the JACK2 Binaries link (JackOSX 0.92_b3 as of this writing).
Because of some Mac OSX security thing, you have to install this by going to Finder, the downloads
folder, Ctrl-click on the .pkg file, and then click “Open”. Then you can install it.
Same as above, go to downloads folder in Finder, Ctrl-click and click “Open”.
Shouldn’t need to reboot, but do it if it asks.
Start JACK Server
Here’s where I differ from the previously referenced page. We’re going to run the server from the command
line.
Open Terminal. If you don’t know where to find it, go to Spotlight search (search icon on the top bar)
and type “Terminal”, then Enter.
A little user-interface change I like to do is enable visible tab bar on Terminal: On the top click on
View -> Show tab bar.
Go back to the Terminal window and type jackd -d coreaudio -r 44100 -p 128 and press enter.
You will then see a bunch of output, but if it doesn’t say “Failed to start Jack” or something along those
lines, then you are good to continue. This is what my window looks like:
[Optional] If you want to use non-default devices, you’ll have to specify them with -C and -P at the end. To
show what devices exist, use jackd -d coreaudio -l. You’ll see for each entry something that says
“internal name.” Don’t worry about the “Failed to open server” because in this case that’s what we wanted – just
to list the devices but not start the server. Now that we know the internal names of the devices, we can put the
input after -C, and output after -P: jackd -d coreaudio -r 44100 -p 128 -C "InputDeviceName" -P "OutputDeviceName"
See the next image for sample of what I have.
Run JackTrip
In Terminal, open a new Tab either by Ctrl-T or clicking the plus in the tab bar.
For Hosts (must run this first before client):
Type jacktrip.exe -s
This is what mine looks like:
When the client successfully connects, you’ll see this:
You might see UDP waiting too long warnings. No worries, it works.
For Clients (must wait for host to run first):
Type jacktrip.exe -c IP_ADDRESS
IP_ADDRESS is what your host will give you (the one the he or she should have looked up if they followed the Open Ports section. Note that I am using a local IP address because I’m connecting
within my network for demo purposes, but the number you put in will most definitely NOT be 192.168.X.X. You
should see a bunch of stuff, but important to see is “Received Connection for Peer!”
At this point, you should be all connected and ready to do virtually-lagless audio communication! From here,
see the Notes section for tips and warnings. Once you’re done with your jam sesh, stop
everything by going to each command window and pressing Ctrl C (as if you were
copying something). This kills the process, and you can close the windows.
Notes
I don’t think it needs to be said, but I’ll mention it anyways: after you’ve got it working once,
all you need to do for the next time is to run JACK and JackTrip – no need to reinstall everything.
All parties must use the same sample rate (-r) and buffer size (-p) parameters, or else JackTrip
will fail to connect!!
Use headphones! Because there isn’t any sound processing, there’s no noise- or echo-cancellation.
Using it without headphones, however, is a good way to see how good the latency is, since you can
hear your own echo from the other person’s speakers.
Ctrl C on both Windows and Mac stops the program. Sometimes, you need to spam it. If
one person does Ctrl C on their Jack Server, everything will start buzzing, so just
mash Ctrl C when you hear incessant buzzing.
To save your sanity, most command lines have some nice features:
Pressing Arrow Up Key goes back in time through your command history. So, if
you want to edit your previous command, press Up, and then start deleting/typing. Arrow Down Key goes forward in time, up until the current time, duh.
If you’re not quite sure if you’re typing the correct path to some folder or file, you can
always press Tab to cycle through auto-complete. For example, in the Windows example, you
can type cd C:\Progr and then press Tab, and it should automatically fill in cd 'C:\Program Files\'
I chose the jackd parameters from experience; a 128 buffer size had latency that was barely
perceptible. If you can sort of hear the other person, but there’s quite a bit of buzzing noise on
top of it, then you might need to increase your latency. In the jackd command, instead of -r 44100 -p 128 try -r 44100 -p 256. Then restart JackTrip as well. Again,
all parties involved need to be using the same -r (sample rate) and -p (buffer size).
DON’T USE WIFI. Locally, with Betty’s Macbook on WiFi, and my computer on ethernet, we could do -p
256, but the latency isn’t as good, and you won’t have as good of an experience.
On Windows, you might run into an error starting up certain audio programs after you
install JACK2.
There’s some critical bug that hasn’t been fixed. For example, my Sibelius
software crashed upon opening every time. There is a workaround, and involves disabling Address
Space Layout Randomization. It’s a small security decrease, but it’ll prevent your audio
applications from crashing. If you want to read about the bug, go here: https://github.com/jackaudio/jack2/issues/332. Otherwise, to fix
it:
Go to your start menu, and type “Windows Security” and launch the app.
Then go to “App & browser control” and then scroll down to “Exploit Protection”. Click on
“Exploit protection settings”.
Go down to to “Randomized memory allocations (Bottom-up ASLR)” and change it to “Off by
default”.
You might have to restart. Everything should work now.
In case you want to pipe audio around to, for example, record all the audio streams, the easiest way
would be to use qjackctl (type in Spotlight or Windows Start Menu – the program is called Jack
Control, but qjackctl also brings it up) after you’ve connected JackTrip between host and clients
and opened up whatever software you need to use (OBS, Reaper, etc.). Click on the “Connect” button,
and you’ll see the connections window. You can drag inputs from the left side to outputs on the
right side. This will require some experimentation on your part, because I won’t be able to cover
all the cases. Here’s an image from QJackCtl’s screenshot page:
Hopefully this has been helpful. It’s a lot to parse if you’re just reading it, but I promise if you go
through and follow it step by step, you won’t have any problems. I hope this can allow many more
musicians to collaborate, especially realtime, because, let’s face it, syncing audio and video or
recording with yourself is fun and all, but it’s a pain in the butt. Happy Music Making!
Today we’re going to be looking at figuring out how to calculate the execution of polyrhythms. It can seem difficult trying to figure out how to divide a beat into different numbers evenly, especially if they’re odd or prime numbers. But all it is is simple math, and once you have the system down, it’s pretty automatic and you can even find patterns that are even more helpful (and you probably learned those in music school if you went).
Before we start with that, I also want to introduce a new subsection of the website: labs.seanchenpiano.com. I have a lot of programming projects that I’ve worked on throughout the years, and I’m going to try to finish them up and put them on. They won’t be super polished at first, and will receive many updates after publication. Right now, there’s only one thing on there, and that is a polyrhythm metronome app. It should work on most browsers and devices, but let me know in the comments if anything is buggy, or any feature requests!
Preface
Polyrhythms are usually not meant to be performed exactly mathematically correct. Oftentimes it is just a composer trying to fit more notes into a beat, or maybe the composer wants the de-synchronization as part of an affect or expression, and not necessarily the precise division. But just like with many expressive techniques, I think it is important to know what the baseline is — what it should precisely be — before you add in rubato or other personal touches. So, just to be clear, I’m not advocating for metronomic or robotic execution of polyrhythms.
Definition
So what are polyrhythms? It happens when you have two or more voices going, and each of them are dividing a beat into different tuples. Tuples are just a subdivision of beats: duples, triplets, quadruplets, etc. The most common of polyrhythms is 3 against 2 or 2 against 3, written 3:2 or 2:3, and most musicians learn how to execute those early on. I’m not aware of any tradition or logic behind what number goes where; for me, as a pianist, it seems that the first number corresponds to the right hand and the second to the left hand, though I can see it being interpreted as the second number being the general beat of the passage, and the first number being the “ornament” or deviation.
9:5 Polyrhythm from Scriabin’s Etude Op. 42 No. 1. The actual meter is 3/4
The Problem
We want to find a method so that we can be 100% sure of where the micro-beats should lie. Let’s do a pie analogy:
We have a whole pie.
We want everyone at the dinner to get the same amount of pie with no leftovers
We know we are going to have either 2 or 3 people at the dinner.
How can we divide up the pie so that regardless of whether 2 or 3 people show up, we can divide the pie evenly?
The question then becomes, what number of slices divides into both 2 and 3 without remainder? The answer lies in something you learned in elementary school, but probably didn’t care to remember how to calculate it: the Least (Lowest) Common Multiple (LCM). But wait, there’s more! In order to calculate the LCM, you need to know the Greatest Common Divisor (GCD) of the two numbers. Yay! Math! Fun!
Keep in mind, this proof is very non-rigorous, and probably has many holes and unwritten assumptions. But I hope it’ll make it logical how to find the LCM.
Numbers
A couple of terminology clarifications.
I’ll be saying “number” a lot, but what we really care about are only the natural (or counting) numbers: . So, you can replace any “number” with “natural number” or “positive integer“.
In this set of numbers, we call one number divisible by another if the remainder is exactly 0. You might say, “3 IS divisible by 2; you get 1.5!” Again, we are dealing with the set of natural numbers, and 1.5 is not in this set, so 3 is not divisible by 2.
A factor or divisor of a number divides that number, i.e. 2 is a factor 6, but 5 is not a factor of 6.
A Common Multiple
Most of you might recall that to find the LCM of two numbers, you should just multiply the two numbers together… or something. But let’s reason this out:
A number is always at least divisible by 1 and itself; there can be other factors, but the number itself and 1 must always be factors. (Think prime numbers: they are the least divisible numbers, besides 1, and even they are divisible by one and themselves.)
The easiest way to make any number into a multiple of another number is to multiply by .
Fine, so we have a number , and its factors include at least 1 and . If we want to make that number also a multiple of , then we multiply the two together. Algebraically, the fact that this makes the resulting number a common multiple (ACM — my abbreviation) is obvious. (Note for people who don’t know algebra, when we write two variables right next to each other, we mean that they should be multiplied):
You can divide by and get and vice versa. And we can be sure that there is no remainder, because by definition, and are whole numbers.
Let’s call this product officially the ACM.
The Least Common Multiple?
How can we be sure it’s the least common multiple? And if it isn’t, how can we make it the least?
Let’s assume for now that this ACM is not the LCM, and that there is a whole number that you can divide the ACM by to get the LCM. That means:
Fine! So if this new fraction is indeed the LCM, we can then still divide by each of the original numbers (and get 0 remainder). Let’s see what we get if we do that:
So, since the remainder must be zero, that means that are both whole numbers, and thus must be a divisor/factor of both and . We now divide the ACM by to get a new common multiple. If this new common multiple is not the least, then we should be able to find another common divisor of and . Rinse and repeat until there are no more common divisors, in which case, we have found THE least common multiple.
So all we have to do to go from ACM-> LCM is to continually divide by common divisors until there are no more common divisors besides 1 (since dividing by 1 doesn’t change anything).
Example:
An easier way than dividing sequentially through all common divisors is just to find the greatest common divisor, and divide our ACM by it. Almost there.
Greatest Common Divisor
The GCD of two numbers is the largest whole number that divides both numbers without remainder. For example, and . You can check for yourself using these examples that the gcd is the largest number that will divide evenly both numbers. Sidenote: numbers that have a GCD of 1 are called coprime numbers.
There are many methods for finding GCD, including the Euclidean Algorithm. For our purposes (since polyrhythms don’t tend to get that high in number), we can just try every number from smaller of the two numbers (whose GCD we are calculating) down to 1. If you get to one and haven’t found a number that divides into both, then the GCD is 1, and the numbers are coprime, in which case the ACM we calculated is equal to the LCM. Otherwise, you divide the ACM by the GCD to get the LCM.
The Least Common Multiple!
Let’s summarize the equation for finding the least common multiple:
So what do we do with this?
Method 1
Again, let’s do any easy example: 3:2 polyrhythm. First, we write down all the numbers:
Then, on the bottom, we want to ask ourselves, if two people showed up to our pie party, how many slices would each one get? . So on the bottom row, let’s write two groups of “123”
Now, let’s put an X on the first of each group, and erase the rest:
Then you
The X’s are where the notes are going to be played. Do the same sort of thing for the top, except now it’s three groups of two (the pie divided among three people):
And then change the first of each groupinto X’s
To read this chart, we count to 6, and on one hand we tap the top line, and the other the bottom. Now you have one way of thinking about 3:2 accurately – subdivide the beat into 6, and play the notes on their respective microbeats.
But, when the polyrhythms get more complex, it can result in a high LCM, and we don’t want to have to count to that high of a number. There’s a cyclical way to think about this chart, and we will do it with the same polyrhythm.
Method 2
For this method, you will choose one of the divisions to be the main “pulse.” In this case, since the duple is on the bottom, that will be the main pulse. We’re going start by doing the same thing as the previous method:
Now copy the bottom line to the middle line, and then put X’s on the bottom line first micro-beats, like so:
Next, let’s put our 3 groups of two on the top line:
And then turn them into X’s:
Last step, for each top X, copy the number directly under it and overwrite the X:
Though in writing this seems like a lot of steps, in practicality, you don’t need a lot of the intermediate steps once you know what’s going on.
To perform this, you tap or clap the bottom line, then you start saying the middle line quietly (or thinking it), and then once you get a good groove, you start accenting the numbers that fall on the top line. In graphical form, you would be doing something like this: 1 2 3 1 2 3, where the gray numbers you don’t say out loud, the magenta ones you do, and you clap on “1”.
This way of thinking about polyrhythms is how some conservatories teach you. Again, that is to clap the bottom line, think the middle line, and say the top line:
This table also gives you a visual aid to use if you want to tap, say, the right hand for the top line and left hand for the bottom line. You can see how things are supposed to line up.
Here’s one for 7:3 ( ) in both table versions:
The second one is easier to count, right? (I mean, neither are particularly easy.)
Conclusion
Again, I want to make sure to emphasize that one should not be robotic about their performance of polyrhythms. However, knowing how it should mathematically work allows you to know what the baseline is. And with modern music, sometimes you have to do it precisely! I hope this and the tool on the labs will help you. Again, check out labs.seanchenpiano.com/polyrhythms! The default (non-verbose) mode on the metronome shows you the cyclical way of counting (method 2), and the verbose mode shows you everything!
This post was originally going to be some extended analogy between science and music, about how knowing contrapuntal rules can help you memorize pieces better, just like how knowing various physical rules can help you derive formulas easier. In the end, I don’t think the connection was super interesting beyond the obvious. I’ll still write a bit about it, but it’s mostly so I can actually post these animations that took me forever to make.
The scientific rule I want to look at is from chemistry. Take a look (click the play button):
I think all good art follows some kind of rule (even chaos can be a rule), and we can use that rule to make sense of the piece not only for memorization, but also for interpretation.
I chose an example from Chopin because he studied and carefully internalized Bach’s works, mixing contrapuntal integrity with harmony, dance, and melodies to create a style that was distinctly his own. On the surface, many works seem to have a homophonic texture – melody with accompaniment. But, further analysis reveals the effortless way in which he incorporates counterpoint into his signature texture. These rules grant predictability to how the chords are voiced and how the accompaniment is arranged. This predictability is not bad. Rather, each note is in its perfect place; there is logic to it, such that Chopin could not have written it more perfectly.
Hope you enjoyed those little animations. They were made using https://greensock.com/gsap and https://mithril.js.org/. I also learned that it’s quite convoluted trying to add your own scripts and stylesheets to WordPress.
In this post I hope to give musicians (or anyone with a musical background) an easy insight into how a web page gets from the “internet” onto your browser. You won’t learn how to program, or even get a remotely detailed look at it, since this will be a high-level overview. But hopefully, it will allow you to be able to communicate more clearly with someone who is a programmer (especially if they’re working on or maintaining your site). And besides, we live in a world now where everything is basically a website; even many of the “apps” on your phone are just basically running a web browser.
For programmers who are interested in the behind-the-scenes for musicians and performers, this is just as simplified (and agenda-ified) a view of musicians as it is of web rendering, but hopefully it inspires you to read more into it.
Scenario: musician
Okay, so let’s say you’re a pianist – you’ve gone through years of school, learned how to interpret the score and make stylistically informed performances. Your teachers have put good habits into your practice and your playing, and you’re out on your own now.
You get a request one day to perform this cool Cage piece. Since you don’t have a copy of this piece, you have to get one from the library. You look up the phone number of the library, (123) 456-789 and call them, because you’re too lazy to go there physically. You ask the librarian if you can borrow the cool Cage piece. She checks her computer for a bit, and then puts you on hold. Moments later, she returns and says, “I’ve found the piece you wanted.” You’ll get it in a few days.
Few days later, the score comes in the mail. You take a quick look at the score. There’s a note in the first page that says that there are two inserts necessary to perform the piece. Confused, you call the library back, and ask the librarian about the inserts. “Ah,” she says, and puts you on hold again. She returns and says, “I’ve found the two inserts. One of them has some extra dynamics and articulations that either aren’t in the score or are corrections, listed by measure and beat numbers; the second insert has some complicated performance directions. We’ll send it over.”
A few more days pass, and now you have all the parts and begin learning the piece.
As you read through the piece, you realize that the first insert (of dynamics and articulations) has two options. One of them is meant for performances in large halls, the other for small halls. Furthermore, there is a small addendum in case the performer does not have access to electronic amplification.
The second insert is more involved. You have to roll dice to get random numbers, rearrange parts of the score, repeat some sections, etc. This is some serious business!
The day comes for your performance, and after all of your work reading the score, incorporating the right option in the first insert (you didn’t know how big the hall was, or if they could provide amplification, so you were pretty stressed out), and following all of the instructions in the second insert to a tee, you’re met with thunderous applause and standing ovation perplexed faces, furrowed eyebrows, and noncommittal applause, because modern music.
Scenario 2: Web Client (browser)
Okay, so let’s say you’re a browser, maybe Google Chrome – you’ve been programmed by thousands of programmers, learned how to read HTML, and render it onto the screen according to all of the specifications. Your programmers made sure you followed all the rules before they released you, and you’re now installed onto some bozo’s computer.
One day, the bozo opens you up, and directs you to go to a website. Since you don’t have this website in your cache, you have to call its host and get a copy. You look up the IP number of the library, 123.456.789.012, and call them, because you’re a browser, and you can’t go anywhere. You ask the host if you can get that HTML page that the bozo wants. She checks herself (because she IS the server) for a bit, and then puts you on hold. Milliseconds later, she returns and says, “I’ve found the HTML page you wanted.” You’ll get it in a few milliseconds.
Few milliseconds later, the HTML comes in through HTTP. You take a quick look at the page. There’s a note in the header that says that there are two inserts necessary to render the page. Confused, you call the host back, and ask it about the inserts. “Ah,” she says, and puts you on hold again. She returns and says, “I’ve found the two inserts. One of them is a CSS that has some extra styles that aren’t in the HTML, or are corrections, listed by element class or ID; the second insert is a JavaScript file. We’ll send it over.”
A few more milliseconds pass, and now you have all of the assets and begin rendering the page.
As you parse the HTML, CSS, and scripts, you realize that the CSS has two options. One of them is meant for large screens, the other for small ones like smart phones. Furthermore, there is a small addendum in case the browser does not support modern CSS grid-based layout.
The second insert, the script is more involved. You have to generate random numbers, rearrange parts of the DOM, repeat some elements, etc. This is some serious business!
The time comes for your rendering, and after all of your work parsing the HTML, incorporating the right option in the CSS, and following all of the JavaScript instructions to a tee, you’re met with gratitude and praise from the bozo complaints that it took too long to render, and questions of why the scrolling is so laggy.
The Components
HTML <-> Score
HTML stands for HyperText Markup Language. Hypertext just means text that can contain hyperlinks (which are links to other webpages). The important thing is that it’s a markup language which is a way to create documents or pages that describes not only the content, but any other metadata attached to it. There are many other markup languages, like XML, EPUB, and RSS.
Music notation is a markup language. It contains not only the raw content (which we can call the notes), but also metadata, including time signatures, tempo markings, key signatures, ossia, etc. In fact, this is why there is a portable music notation format, MusicXML. Most importantly, without scripts, HTML is static, unchanging. Scores, without performance indications, remain static as well.
Just like you can define things like a <table>, <div>, or <script> in HTML, you can create <measure>, <clef>, and <pitch> in MusicXML. In most markup languages, you need to close your tags with a corresponding one: <table>content</table> or
CSS stands for Cascading Style Sheets, which contain the styles necessary for rendering the page. Styles can also be defined in the HTML, but for reasons such as the one in the scenario above, you might need different style sheets depending on the window size, or even the font size. It’s called cascading, because styles defined later override previous ones, just like corrections in scores. The difference in this comparison would be that we usually don’t put dynamics and articulations in a separate file, again, unless they’re corrections.
JavaScript <-> Performance directions
JavaScript is a programming language. Browsers can read these scripts and perform the work that is asked of them. For example, a browser could be asked to fetch a video, or calculate some numbers, or render 3D graphics, just like how performers can be asked to sing, hit the inside of the piano, or sit there in silence. These are not standard things in music, and equivalently, the things that JavaScript asks the browser to do are not able to be represented in HTML, because they often encode dynamic behavior.
In modern websites, most of the power and heavy-lifting is in the JavaScript. When you see a website (like mine) that is a SPA (single-page application, which means that clicking on different links within the site causes the content to be changed dynamically, and not through an entire page load) you can be sure that most of the work is being done by JavaScript. In fact, my HTML file is probably 30 lines long, whereas there are tens of thousands of lines of JavaScript. By using JavaScript, you can generate HTML on the fly, and so the user experience is more interactive and dynamic.
Programmer <-> Composer
In this case, we are talking about a front-end programmer. They program the HTML (in a very generic sense, keeping this high-level), just like composers write down the score.
If we are to make it more modern, programmers usually work indirectly with HTML, usually writing code that generates HTML (either on the server or client side). The equivalent would be a composer jotting down sketches, and then having an arranger flush out the orchestration, or a publisher cleaning everything up and typesetting it so that it is readable.
Client (Browser) <-> Musician
Musicians are trained and have musical knowledge within them to read the score, and parse the performance indications. Browsers each have a rendering engine – Chrome and Safari use versions of WebKit, Firefox currently uses Gecko, and Edge uses EdgeHTML. These all read HTML and can translate that into a web page, just like how musicians can read a score and turn it into music. Furthermore, all of the browsers have a JavaScript engine – Chrome uses V8, Firefox uses SpiderMonkey, and Edge uses ChakraCore. (The one clear takeaway is that programmers need to come up with better names.)
Server <-> Library/Music Store
To get the score we have to either get it from the library or a music store, if we don’t already have it. Similarly, the browser needs to get the HTML page from a server, if they don’t already have it in the cache. The server does a lot of things behind the scenes, just like a music store or library would have a lot of internal workings that you don’t see, such as how different pages are stored, how databases are accessed, etc.
I hope this gives you a bit of an understanding into what goes into rendering a page. I didn’t define every term in the scenarios, but I think given the parallel, they should be self-explanatory. And, if not, there is always Wikipedia. Let me know in the comments if there’s anything specific you’d like to hear about!
I think I’ve reached a point with this new website where I feel comfortable saying it is pretty much done. I just wanted to do a quick post about the process, and what I learned. First off, all of the code is open source on GitHub: https://github.com/kamiyo/sycpiano. Thanks also to my brothers Jason and Andrew for getting me started and helping me with things, especially in the earlier stages. It took around 2 years! Don’t worry if the acronyms mean nothing to you – I’m going to do a simple musicians guide to web programming later!
Feel free to skip to the last section (Main Takeaways) if you want to read the main takeaways. The following sections are just me bragging a little bit about the web programming technical things I learned, so I can feel a bit better about myself and not like I’ve wasted two years in working on this website…
Going In
I had programmed my previous two sites myself as well, but I didn’t have the guidance of two programmers at those times. To go back further, I was messing around with HTML and CSS back in the blogger and Geocities days.
So I came into this process knowing a bit:
HTML
CSS
JavaScript (vanilla)
PHP (sorta)
MySQL (very basic)
Messing around with .htaccess
I was fortunate to have taken some comp sci courses when I was in school, so I had a solid foundation of any ALGOL-like languages (C, C++, Java).
What I Learned
The early stages of the website was all about learning the framework and modern JS. In my old site I just gzipped up the JavaScript file, and served it along with some libraries like jQuery through their CDNs.
My brothers suggested I use React as my framework, whereas for my previous site I used AngularJS (v1). They also setup a toolchain using Webpack and Gulp, running on NodeJS. Later on we dragged Typescript in.
So, things I learned:
Almost everything runs on JS now.
You basically never touch .html files anymore.
React
NodeJS
Reducers and state management
Typescript and Modern JavaScript (es6+)
Promises!
Using and creating a restful API
Using a build tool like Webpack
Postgres, using an ORM like Sequelize, and Full-Text Search
A bit about Nginx and some server stuff like using pm2 to keep the Node server running.
More familiarity with version control (git)
CSS-in-JS solutions
Canvas and WebGL animations
Using Chrome devtools
And not web-related, I learned a bit on using OpenCV and doing some facial recognition (trying to automate thumbnail creation of my own photos) and about constant-Q transforms when turning audio time data to frequency data (as seen in the music visualization). I’ll also do a post about that.
Main Takeaways
Mostly, I learned I have no design chops. I have the hardest time choosing colors and layout, and making user interaction decisions. So much of the design is literally hours of trial and error. The coding part is fine. It’s the design part that is hard.
It takes time. All the code planning, debugging, refactoring, especially when you don’t have experience working with a large codebase. But you learn alot. And you save money.
Everything is on theinternet. Stackoverflow, GitHub issues and gists – if you have a problem, chances are someone else has had it before you.
Cross-platform is a b*tch. Just because it works on one browser on one device, doesn’t mean it will work on another one. I’m also starting to think mobile-first would be the best way to go (which is not what I did). It’s harder to do good mobile UI/UX compared to desktop. You can tell on my site mobile was (not-quite, but almost) an afterthought… or like a halfway-through-thought.
Designing your own website means you can have it exactly the way you want. If you want a feature, you implement it. If you can’t, it’s because you’re not good enough, not because it’s not possible.
Modern web development seems to be “libraries, libraries, libraries” but it really does make it easier. Because of that, a lot of development time is spent also on building and making sure the shipped code is compact and performant.
Finally, just like how artists learn by tracing, composers learn by transcribing, and musicians learn by listening, it’s helpful to start coding from examples. I was sort of reluctant to learn React, and all this new stuff, but since my brothers helped get things started, I could study what they had written and learn from there.
This article is cross-posted with American Pianists Association’s Beauty of Music, a regular feature on the American Pianists Association blog that covers variety of topics to help readers better understand and appreciate the music they love. Sign up for 88 Keys, the monthly newsletter of the American Pianists Association, to automatically receive each issue.
I was fortunate four years ago to be selected as the winner of the American Pianists Awards, becoming a Christel DeHaan Classical Fellow for the following four years. The competition was a year-long process, which included performances with the Indianapolis Symphony Orchestra, Indianapolis Chamber Orchestra, the Linden Quartet, and soprano Jessica Rivera. It was one of the most amazing musical experiences of my life! I also got to hang out with my fellow finalists, most of whom I was already friends with, and get to know the amazing arts community of Indianapolis.
Apropos to the concert Nikita Mndoyants will be giving for APA’s Grand Encounters, we will be talking about Liszt’s paraphrase of the overture to Wagner’s Tannhäuser. It is a piece that I have worked on as well, both in Liszt’s form, as well as in the original form when I was a violinist in the Conejo Valley Youth Orchestra. I am so grateful that we tackled this piece in youth orchestra, because I got to know this piece intellectually and emotionally before I ever set out to learn the transcription. The scrubbing and woodshedding I had to do, both on the violin and on the piano, for this piece will never be forgotten.
For your enjoyment while reading, here’s a recording from when I played this overture in a recital for the 2015 Cleveland Young Artist Competition as a guest artist.
Transcription, Arrangement, Paraphrase – what’s the difference?
Liszt used many words: phantasie, paraphrase, transcription, reminiscence, …sur de[s] [themes/motifs de] … , d’après, illustrations, etc. to describe his arrangements. I think you can tell to what degree of freedom Liszt is going to take his arrangements by the words he uses. It seems that transcriptions and paraphrases (and any which just bear the title of the original work) are his most true-to-the-source works.
Transcriptions exist not only in music, but in literature and spoken word as well. If you break down the word transcribe, it is literally “across-write” in Latin, and it implies writing or copying across different forms of media. In language, transcription is more akin to recording – you often get transcripts of speeches printed in papers or news sites. Transcription is also used in biochemistry, describing the creation of RNA from DNA. The “language” of DNA and RNA are very similar, but not quite, and so transcription seems to be a fitting word.
Picture showing DNA to mRNA transcription, which results in protein synthesis. From https://en.wikipedia.org/wiki/Messenger_RNA, uploaded by user Sverdrup
Arrangement is very similar to transcription – it usually means taking a piece and rewriting it for a different instrumentation. My inclination is to consider transcriptions to be more faithful and also more technically demanding than arrangements, which often tend toward simplification or for mass consumption.
Then what about paraphrases? In language, paraphrases are a rewording or approximate copy of something previously written or said. In music, paraphrases might be more flexible with material added in or taken out. Or they may have figurations that are completely changed, or in the case of the Tannhäuser Overture, meters altered. I don’t think Liszt would have really dared to do too much of that with the Beethoven Symphonies, for example.
Transcription as Translation
Another trans- word we should mention is translation. Transcription in musical terms is rather like translation, but instead of moving between languages, it is moving between instrumentation. This seems like a pretty obvious connection, but it becomes even more robust once we get beneath the surface. In any translation of text, there is always the consideration of how literal should the text be. If the translation is too literal, the translator runs the risk of losing high level meanings, such as idioms or figures of speech. On the other hand, if the translation is too free or stylized, the original meaning could be lost, as could cultural-specific ideas.
In transcription of music, these considerations are also important – there are certain passages or chords that can be played in one instrumentation that are impossible on another. The trouble is finding how to make it work on the new instrumentation in a way that is idiomatic, but at the same time retains the essence of the original (whatever the transcriber decides that may be). Furthermore, even the structure of phrases or large chunks of material may be altered to make the music more effective on the destination instrumentation.
The signature of a transcriber lies in how they deal with these challenges. Pianists and music lovers will be familiar with the different ways the details of transcription occur between arrangements by Liszt, Busoni, Godowsky, or Rachmaninoff, etc. It’s the fingerprint not only of their pen and hands, but also of their ears.
Konzertparaphrase
Either Liszt or his publisher titled this piece as a “concert paraphrase” and so we have to consider a bit what this means. Surely, compared to his “Réminscences” this piece is very faithful. However, compared to works like his arrangement of the Beethoven Symphonies, this piece might be considered ever so slightly less strict in its transcription.
I would say the baseline for this piece is a very straight-forward transcription of the orchestral version. For example, the opening wind chorale works very well as is on the piano. Even a lot of the string figurations are pretty much unaltered. But with that out of the way, we can start to see both the subtle and not-so-subtle changes that Liszt makes, and try to see why he made them.
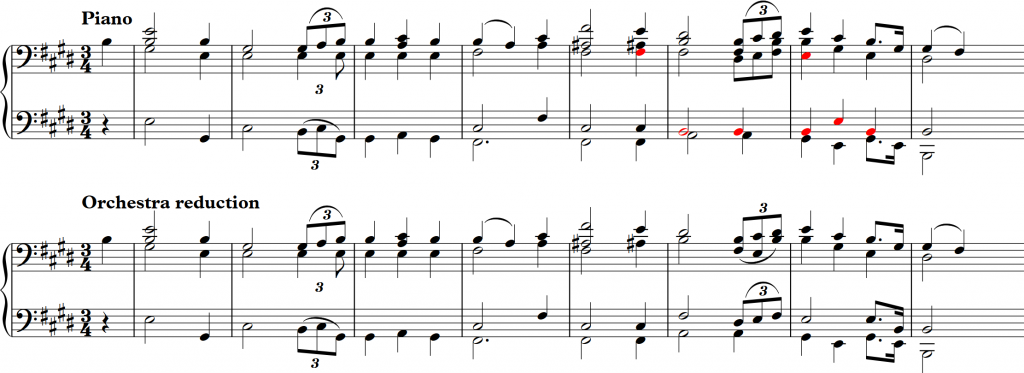
Voice Leading on the Piano
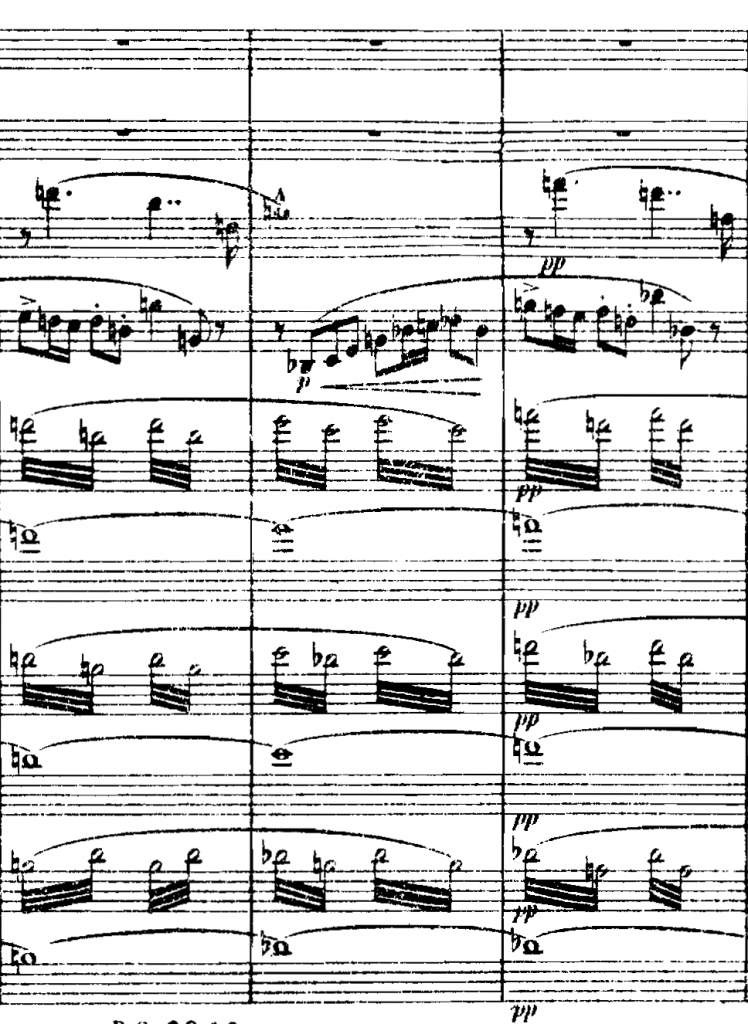
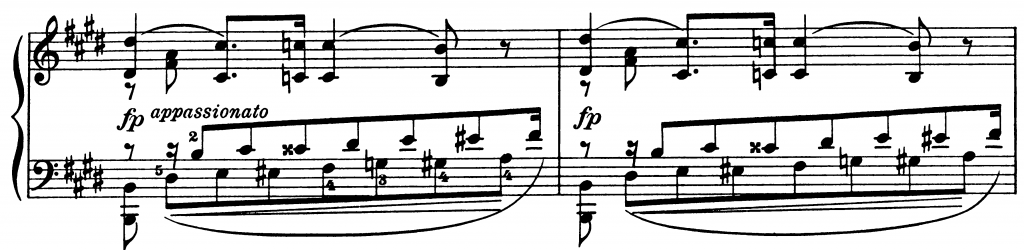
I mentioned previously that the wind chorale in the beginning is mostly the same. The changes are minute, but interesting. Liszt adds some extra notes to make the voice leading work a bit better on the piano – the doublings in the orchestral version would cause some texture inconsistencies if transcribed exactly:
Notice in measure 5 and on, a literal transcription would result in the voice counts decreasing. Liszt was forced to add another voice in the bass.
When played by multiple instruments, doubled notes sound doubled. But on the piano, when two voices collapse to a unison, the audience rarely hears it as such, and it sounds more like a voice has dropped out. I would argue this is the reason why Liszt has made the changes above.
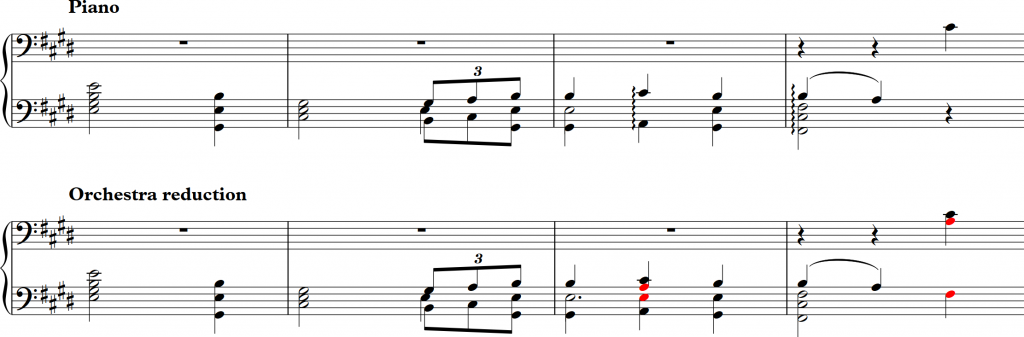
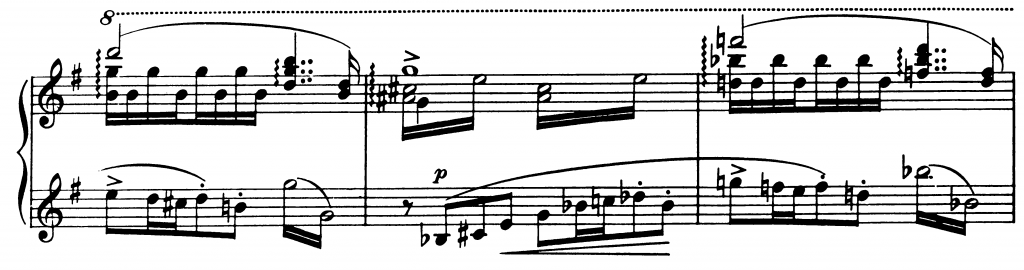
The opposite can also be true – sometimes Liszt will leave voices out, because in the piano transcription it will sound like there is an extra note if unison voices split up:
Here, a literal transcription would result both in an abrupt change in voice count and also an awkward chord to play, given that Liszt wants a left-hand only passage.
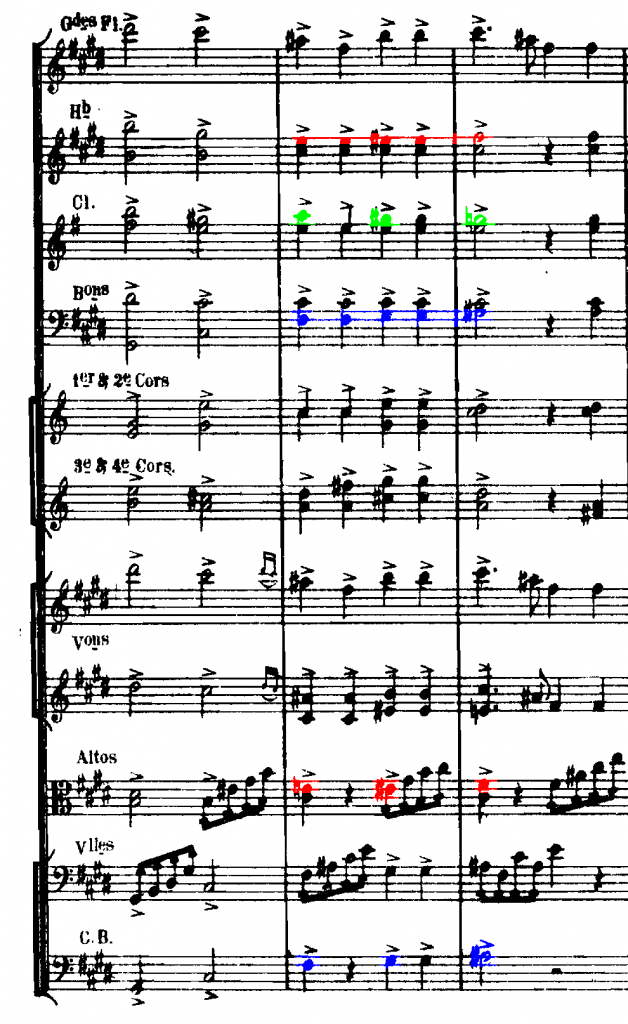
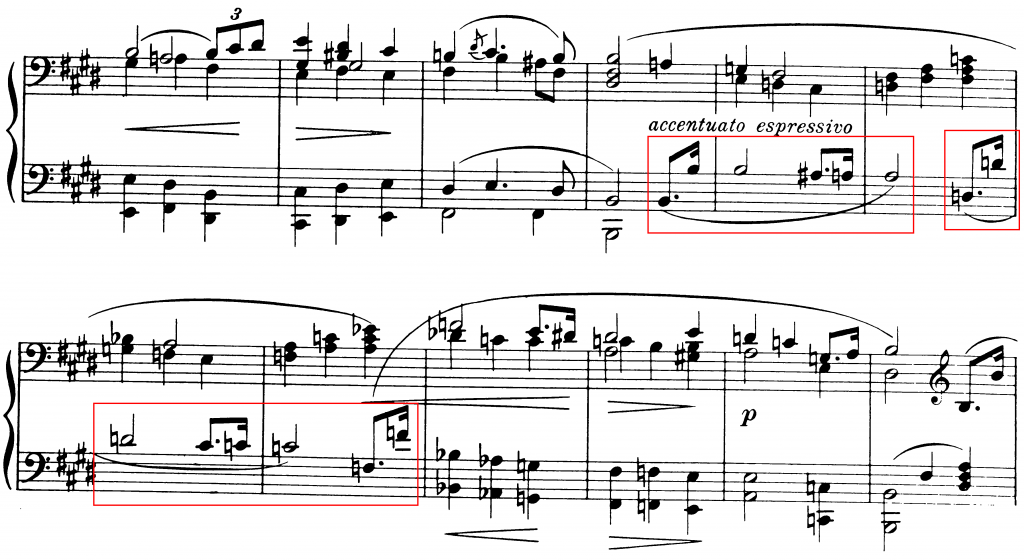
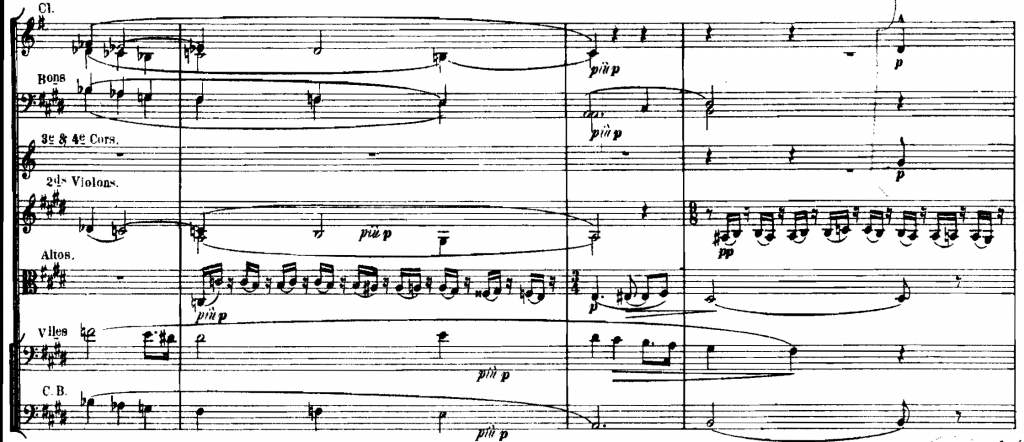
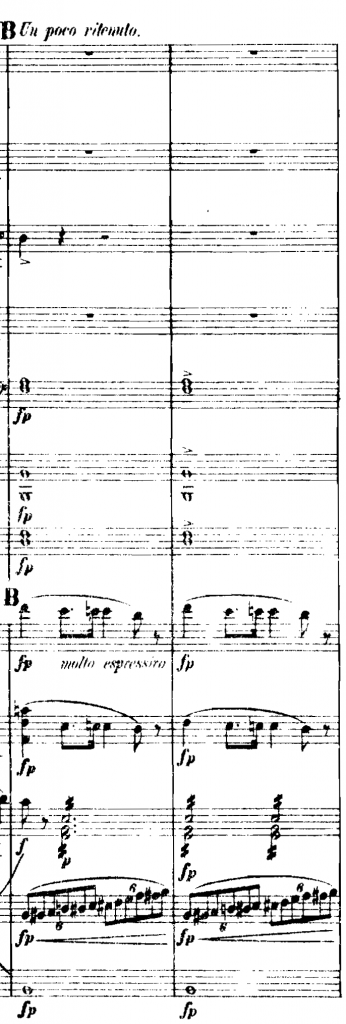
Another instance of changes occurring because of voice leading is during the second theme. He actually leaves out a dominant 7th chord (opting for a straight up major chord) – he probably thought it sounded better without the 7th, but it could also have been a voice leading consideration. In the orchestral version, there two contrapuntal lines that are of interest are E – E# – F# and F# – E# – E. The crossing is interesting, but in a piano transcription with limited voice independence, it seems more appropriate to focus on the one that is more interesting. Furthermore, the bass line is moving upwards F# – G# – A#, so Liszt seemed to want to focus on the contrary motion created with F# – E# – E. Again, he might have just left out the dominant chord because it wouldn’t sound good, but I think the underlying reason is the voice leading.
Descending chromatic scale (green), ascending chromatic scale (red), and bass line (blue)
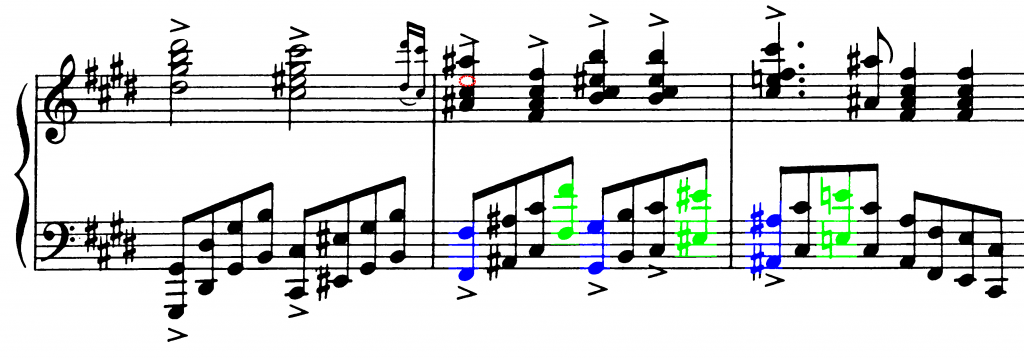
Bass line and descending chromatic counterpoint is accounted for, but the rising chromatic line is missing (red dotted notehead)
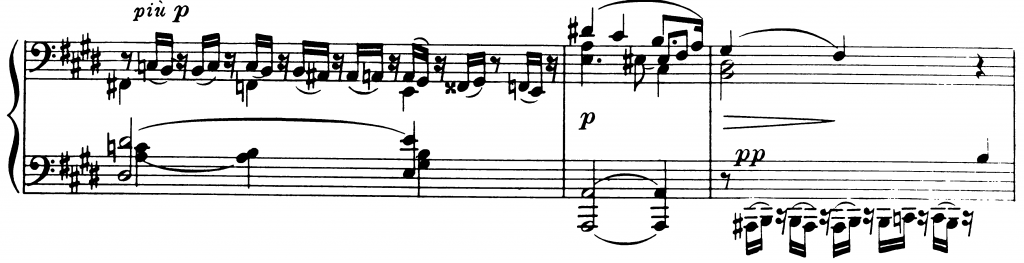
Some changes are more about voicing of chords, where because of the overtones of the piano, it sounds better to have a more open spacing of chords rather than closed. Take for example the left hand here compared to the original cello arpeggios. The difference is small, but the wide spacing sounds better than the closed one on the piano – the broken third in the bass can end up being very muddy.
The timbre of the hands
There is a part of every pianist that wishes their left hand were just as good as their right hand, whether that be control of sound, speed, voicing, or any technical matter. However, I think it is just as well that the hands have their separate character. Liszt thought so, too, because he uses both the visual and aural effect of putting melodies in the left hand. Take for example this second phrase of the opening:
Liszt goes through the trouble of crossing the hands so that the left hand can play the cello melody. Notice later he reverts back, but just the effect of having the melody suddenly be taken up by the left hand is a striking gesture. Not only is it visually interesting, but using the left hand ensures that the melody lies mostly between the thumb, index, and third fingers, which are the easiest fingers to use in terms of weight distribution. This allows for a warmer sound, emulating what the cellos would make.
Return of the theme after the first big tutti. When I perform it I cheat and use the right hand to help, but actually for the bass notes, so that I do not have to roll, but can also keep the left-hand character in the melody. I like the imitation between the right hand in the pickup to the 5th measure here and the left hand in the pickup to the 5th measure – both have a C# – F# leap.
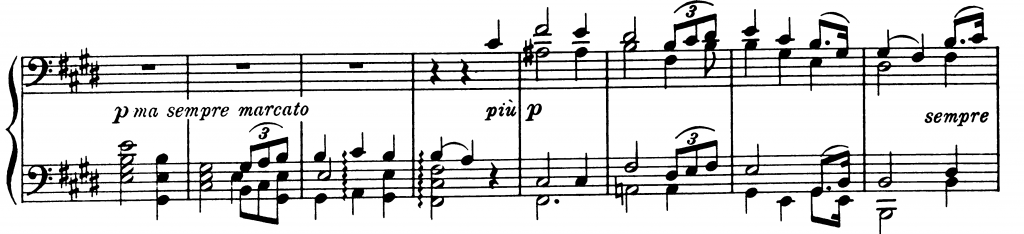
After the fireworks of the first section, the chorale comes back, and Liszt again uses the left hand, this time completely solo, for the first sub-phrase of the main theme. The same effects as the above apply. This also allows the following più p to be even more special, with the addition of the right hand (and thus better control).
Aural Illusion
This isn’t going to be something about Shepard Tones, or weird tritone upwards-downwards ambiguities (which I spent too much time researching than I care to admit), but more about how our brains fill in notes that are omitted, or in different octaves. The closest visual analogy I could find is something like the Kanizsa Triangle, where our brains make a shape out of the negative space. Our brains ability to interpolate is a blessing to transcribers, because often times you just have to leave certain things out.
Kanizsa Triangle uploaded to wikimedia commons by user Fibonacci. We don’t see this as their disparate shapes, but rather as a complete composition.Notice that the melody jumps between octaves. Left hand accompaniment has rests, but because they are filled in by the melody, the illusion is not broken.
One example is in the very first tutti section, where the right hand has to negotiate the broken descending scales. Here the melody alternates between being in both the right hand and left hand, and just in the left hand; thus, sometimes the melody fills up from the bass to the treble, and other times it only goes up to the tenor. No matter, our brains hear the melody as one line (especially if the pianist voices adequately).
Furthermore, the bass is always omitted when the melody is played, but because we still get an articulated attack, we don’t really miss the bass. As long as it is regularly occurring, our brains assume that the pattern continues.
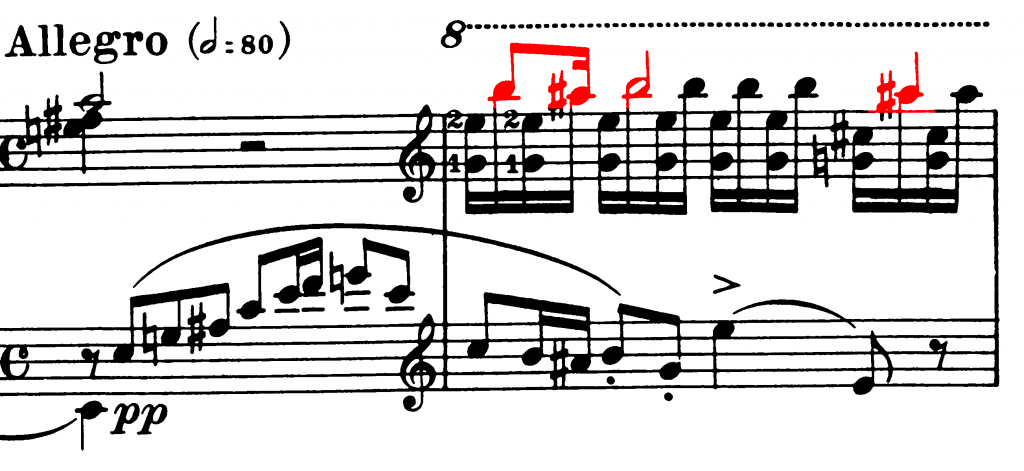
A further striking example is in the main theme of the Allegro – Liszt doesn’t bother to put the melodic high note on the beat. He puts it on the second sixteenth note to make the tremolo pattern easier to play. You can try to come up with alternatives, but none will be as elegant as what Liszt came up with. I think this figuration works because our ears group the first two notes together, so it sounds like a broken downbeat. In fact, we roll and break chords so often in piano music that our ears probably have adjusted to that. It’s really amazing that it sounds better than trying to copy the original rhythm exactly.
Registration
One of the challenges for transcribers is what octave to put notes on the piano. Often we can just put it in the octave that the source is in, but some times that just does not sound quite right. Rather, we must put the notes in the same octave relative to the “normal” range of the instrument. Let’s say there’s a violin passage that’s quite high, like this:
Sorry the instrumentation is cut off. From top to bottom: clarinets, bassoons, first violins div. 4, second violins div. 4
If we put it directly onto the piano, it’s not going to sound as high or stratospheric as the original. In fact, we’re going to have to move it up to another octave so that it has the right sound.
Same ledger lines as the orchestral version, but there’s an 8va here!
Conversely, this passage in the violins is all the way at the bottom of the G string. Liszt opts to go all the way into the bass clef to convey the timbre of the low violin.
The slur figuration is around the tenor range here.
Liszt moves the figuration down into the bass and sub-bass to get the right timbre on the piano.
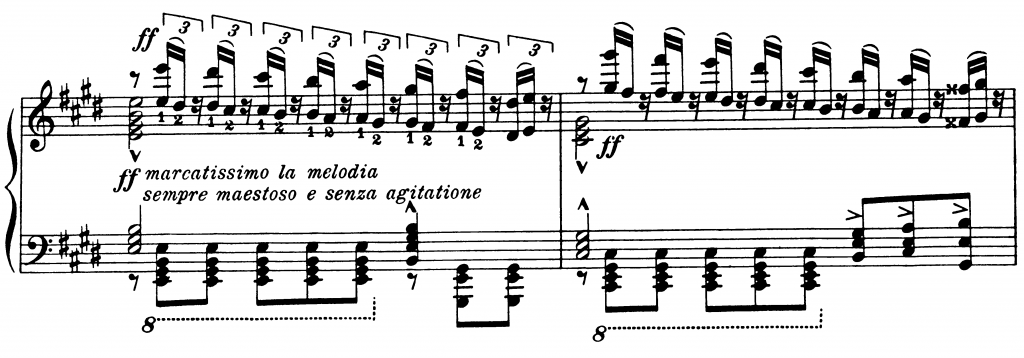
Octave considerations can also apply to whether to put a melody in octaves or unison. Even though two instruments (such as viola and violin) could be playing the same melody in the same octave, the effect is one of rich overtones. Liszt appropriately goes for octaves on this melody.
Making Some Noise
Liszt often gets a lot of flak for putting in runs and chromatic passages as fillers. This piece is no exception, but I do think many of them serve more of a purpose in this piece than others. The orchestral version is loud and full of energy and texture. With only two hands, ten fingers, and two feet, Liszt had to find a way to create the same kind of excitement.
Sextuplets here.
Left hand is original.
In the transition between the first and second themes, Liszt changes the accompaniment figure from a sextuplet chromatic scale, to sixteenth-note chromatically ascending alternating sixths (whew). This change accomplishes a few things. First, it spans a bit more of the range; Liszt gets to cover a bit more harmonic ground and not have a huge whole between the melody and the bass. Second, it’s a bit easier to play metrically than the polyrhythm – it’s not a hard one, but it can affect stamina and pacing. Third, the rotation of the hand in the oscillating sixths allows for a bigger crescendo.
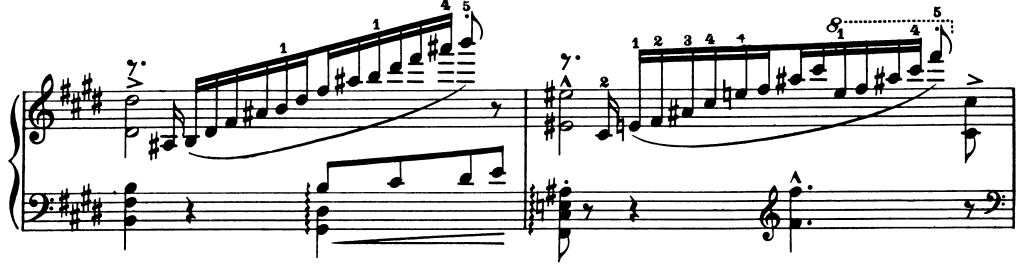
The beautiful soaring melodies after the second themes are accompanied by brilliant arpeggios. These arpeggios are not in the orchestral score, but they help to get across the effect of this nice legato melody after all of the octave chords previously. It also allows Liszt to showcase the ingenious dividing of the theme between the hands as the right hand climbs up the keyboard over and over again. In addition, the runs make it easier to fill out the harmonic content, since a pianist can’t even begin the span the actual voicing in the original.
Negotiating the melody is a challenge, both in voicing and timing.
“If it ain’t Broke…”
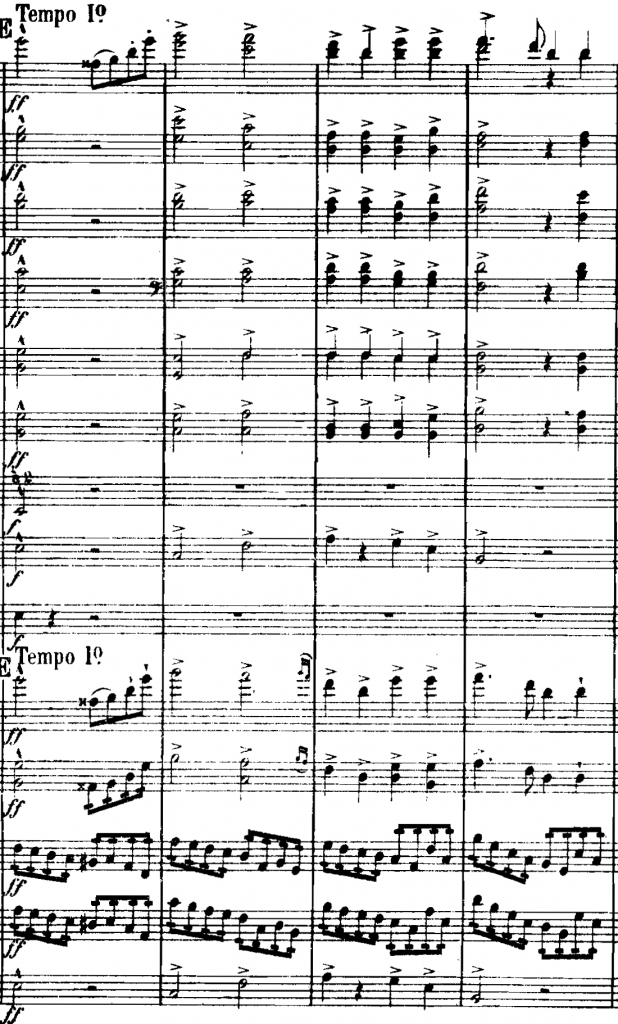
There’s two parts to this topic I want to cover. The first is regarding the relationship between exposition and recapitulation. In the second theme, Wagner changes the orchestration of the accompaniment quite drastically. There’s a bit more scrubbing the second time around, as well as rhythmic diversity (with triplets in the bass). Liszt saw this, thought “well it sounded so good on the piano in the exposition,” and just kept the figurations the same for the recapitulation. I won’t accuse Liszt of being lazy, because let’s face it, the pianist learning the piece is also glad that he or she doesn’t have to learn even more patterns and figurations. However, it’s interesting to think about how it could sound if some of the changes were incorporated into the transcription.
Scrubbing violas and cellos. Pattern is generally downwards.
Left-hand pattern is upwards, same as exposition.
Second is the fact that there is plenty of the piece we didn’t talk about, and that’s because he really didn’t change much from the original source in those parts. The notes are good, and the phrases are good, so Liszt just has to make them fit comfortably in the hands, and he’s good to go. This even applies to that beast of an ending with the flourishing of octaves. There really is no other way that should be transcribed.
However, this is exactly why this piece is so difficult to play. The fact that it is so close to the original version, and that Liszt made very little compromises, especially in the little figurations, means that the pianist really has to be an orchestra. That means singing individual voices, having different colors, filling out the entire dynamic range, and building up the stamina to perform such a work.
Addendum
This article wouldn’t be a Sean Chen pianonotes without some re-transcription. As a reward for getting through the entire article, I’ve engraved some of the additions I made to the piece when I performed it. The best part about transcriptions is that you get to hear the piece as the transcriber heard it the original source. Here, we get a glimpse into what Liszt heard when he heard the piece performed live (I assume he did hear it). But, I’m fully of the opinion that if you hear different things, it is okay to add them or change some things in a transcription. You can probably find where these changes should go easily. Without further ado:
Right before the first tutti section.Those tremolos in the violins are exciting. This is a simple change, but I think makes it sound better than straight eighth notes.I added some counterpoint back in from the orchestral version. My favorite is the little turn flourish near the end.
Today, we’re going to be going through a few tips that I have picked up and figured out throughout my time playing in front of an orchestra. It also helps that I have been with someone for a long time who plays in an orchestra. As with performing recitals and auditions, the best and most effective way to learn how to be the best soloist you can be in front of an orchestra is by doing it over and over again. There simply is no better way. However, I hope some of these suggestions can help accelerate that process. If you have any other tips, please leave them in the comments!
Preparation
Get the Full Score
As you might gather from a previous post, I’m a big fan of having different sources for my information. Having the full score helps you be informed of what’s going on in the orchestra part, more so than having a piano reduction, though the latter might be easier to read. Not only does the full score allow you to see what instruments are playing what, it also allows you to double check the notes and dynamics in your reduced score. You can also work on your score reading!
Listen
This sounds simple and obvious, but listening to recordings helps! That way you know your entrances, and you know what the orchestral part sounds like, as opposed to only hearing a second piano reduction. This offers yet another way to check your notes. If you hear something funny or fishy, check your score – maybe the recording has a mistake, but more often than not, you might discover that you’ve misread some notes or rhythms.
Play Along
I like to play along with a recording of the concerto, preferably with headphones. Knowing not only how the orchestra part sounds, but also how it sounds like while you are playing your part is very helpful, since the difference in timbre between instruments can throw you off. For example, a certain melody might sound clear in the piano reduction, but when you listen to the recording (or show up to rehearsal) you realize that it’s actually not as easy to discern within the context of the rest of the orchestra. Or, some rhythms might be very disorienting (see the 5th page of reduction for Rachmaninoff’s Third concerto – the offbeats in the winds are really confusing).
Conduct
Sometimes, it’s very useful to conduct yourself, away from the piano, or even with a recording. It gives you a good sense of timing, and you get to familiarize yourself and internalize any interesting meter changes. You don’t want leave any of your counting and synchronization solely to “I just feel it,” or “I just go by how it sounds.” Yes you should feel it, and know how it sounds, but we want no excuses!
Sing Along
I find it very, very helpful to sing certain important parts while playing through the concerto. For example, in the second iteration of the first theme of Rachmaninoff’s 3rd (the third and fourth pages, if anyone is looking), the piano has accompanying figures, and I like to sing the main melody while playing through it. It allows you to get the entire picture in your ear, keeps yourself from rushing or slowing down, and makes sure you don’t get confused in phrases where the piano begins with a sixteenth-note rest. You can also figure out what sort of timing you might have to take when you are accompanying a solo wind melody or something similar.
I sang along a lot while learning Bartok’s second concerto – I needed to make sure I knew what to listen for, and not have anything catch me off-guard in terms of rhythm or number of repetitions of certain accompaniment figures.
Learn the patterns
This seems elementary, but all musicians should learn the different conducting patterns. You don’t want to look up from the piano, and not know what beat the conductor is on because you’re not familiar with the patterns.
Knowledge
There are certain infamous parts of pieces, where you must utilize all of the above techniques to make sure you have that section down pat. One of these is in the twenty-second variation of Rachmaninoff’s Paganini Rhapsody, 7 before rehearsal marking 65 – this section has piano runs accompanying a melody in the strings. Jerry Lowenthal told me I had to learn the orchestra tune by heart here and how the piano part fits in, because just relying on feeling can be iffy and scary, especially on stage. I would also advocate conducting this passage to know which beats the phrases begin and end on, because they shift around each successive phrase. So, an example of the “facts” I would tell myself are:
1st Phrase – starts after second beat, peaks on the downbeat of the next measure
2nd Phrase – starts on the second beat, again peaks on the downbeat of the next measure, just like the first phrase, but the run goes on for a beat longer up to the second beat.
3rd Phrase – starts right before the third beat, and peaks on the third beat of the following measure, and the run goes on for even longer, going up to the third beat
4th Phrase – starts only one triplet-eighth after the previous phrase, peaks again on the 3rd beat.
5th Phrase – I would say this one is a “normal phrase” since it starts after the downbeat, and the phrase lasts exactly two bars.
*N.B. when I say “beat” here, I mean in terms of quarter notes. This variation is actually in alla breve.
This enumeration makes the passage even more solid in your head. Knowing these things can help you when you’re not quite clear, and especially when on stage things become a bit unclear and uncertain, either because of how it sounds on stage or because of your nerves.
Tips for the First Date
Wait a bit…
The first thing one learns about playing in front of the orchestra is that they are almost always behind the conductor. No, it’s not that they or the conductor are incorrect, it’s just how orchestras function. First, the plane of the beats is not at the bottom of the conducting motion, but somewhere in the middle after the rebound. Second, there is always a delay in reaction, and so most orchestras naturally have that built in so that people know where their colleagues are going to play.
So, as soloists, we have to account for that, very notably in something like the opening of the Grieg Concerto, or in any final chord of a piece. Furthermore, if we want to land on a chord together at a certain time, we sometimes compensate for that by possibly giving an earlier cue (sometimes that’s not possible), or just waiting a hair before getting to the arrival point.
…but don’t wait too much
At the same time, you have to trust the conductor to follow you, and just do your thing. It’s actually very easy to be too adjustable, and you end up getting slower and slower because you’re trying to accommodate being with the orchestra. (I find this is something that I need to tell myself quite frequently).
The Concertmaster is your best friend
No, not literally, unless of course he or she in fact is. What I mean is that the concertmaster is your window into the orchestra. Sure, you can watch the conductor, and you should. But oftentimes it can be a lot easier to line up with the group if you watch the concertmaster instead. This can include playing with pizzicati (seriously, try this next time) – if the conductor just conducts the group without worrying about you, and you just watch the concertmaster, I guarantee it will be more together than if the conductor tries to follow the soloist; or with any big chords.
Furthermore, the concertmaster is probably the musician in the orchestra that hears the soloist the best, and can see you out of the corner of his or her eye. That means that they are able to pick up on any subtle (or not-so-subtle) rhythmic nodding or accents (for stability of course), or if you are wanting to change the tempo. And the soloist hears the concertmaster quite clearly as well, so that’s another reference for being together with the group (assuming the rest of the group is with the concertmaster).
Adjust your dynamics
The reality of playing with orchestras and in halls that are big enough for an orchestra is that we as soloists need to project more (play louder) than we are used to by ourselves in the practice room. This is especially true when the orchestration is thick or in a register that covers the piano. Conversely, in solo passages, then we can utilize the full dynamic range of the piano, especially the softer parts. Just be aware of chamber-like passages where you might be prone to covering up the solo instruments.
Eye contact
It’s nice to occasionally look up at the conductor; eye contact allows you to synchronize rhythmically and musically. Furthermore, if there is a duet between the soloist and a solo part in the orchestra, having that direct connection can help with the ensemble and the expression.
Before, I talked about following the concertmaster for pizzes, but another useful tip is to watch the cello and bass players (if they’re in your line of sight) especially to sync up the left hand with them – many times you don’t have the time or luxury to look over at the concertmaster.
Respect the Protocol
I’ve really never heard this brought up except by my teacher Edward Francis, but the etiquette for entering and exiting the stage is important. On entrance, first shake the concertmaster’s hand, then take the bow (no pun intended). After the concert, shake the conductor’s hand (they might even give you a hug), the concertmaster’s, then take your bow.
Check with the orchestra people whether an encore is okay. Depending on the length of the concert and/or encore, they might not want you to play – if the orchestra is unionized, they could go into overtime, and then have to deal with financial issues. This could be a problem especially for smaller orchestras, so just be aware of that.
Hopefully all of these things can help make playing in front of an orchestra less stressful. Once you know what to expect, it’s not bad. In fact, playing in front of an orchestra is one of the most thrilling experiences I know of. I think it really is a unique experience to solo musicians; in no other field do you get to take part in such a collaboration and dialog to bring amazing masterpieces to life.

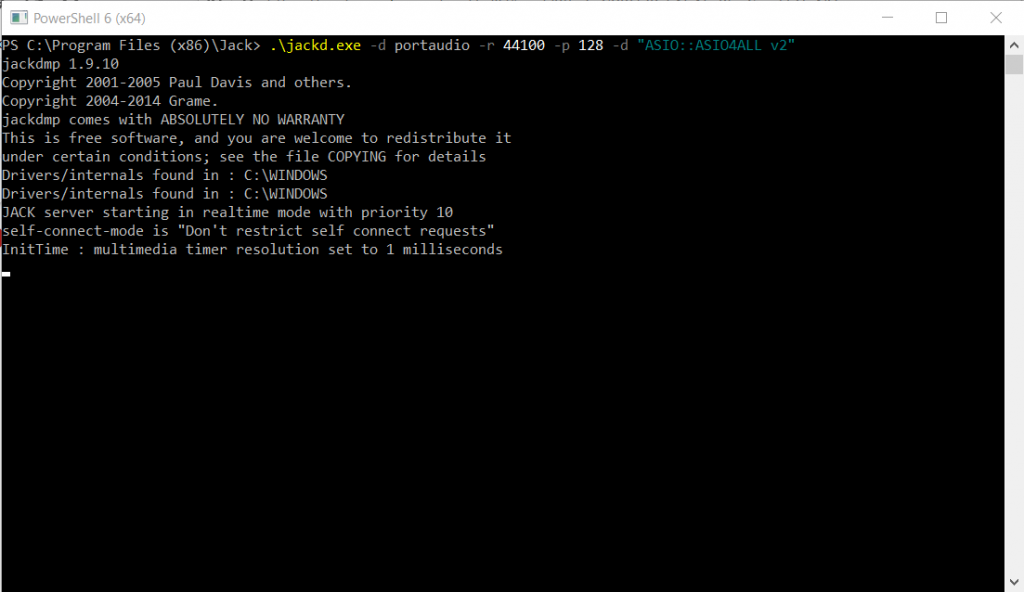

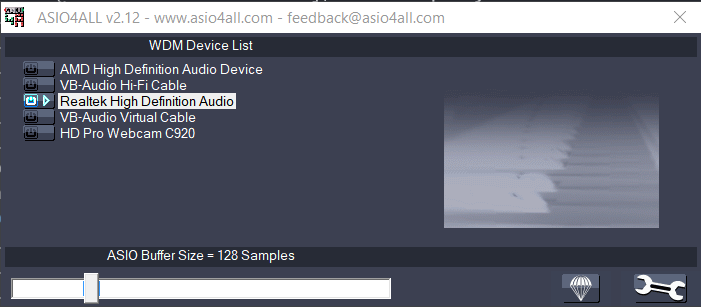 Note that, if you switch audio
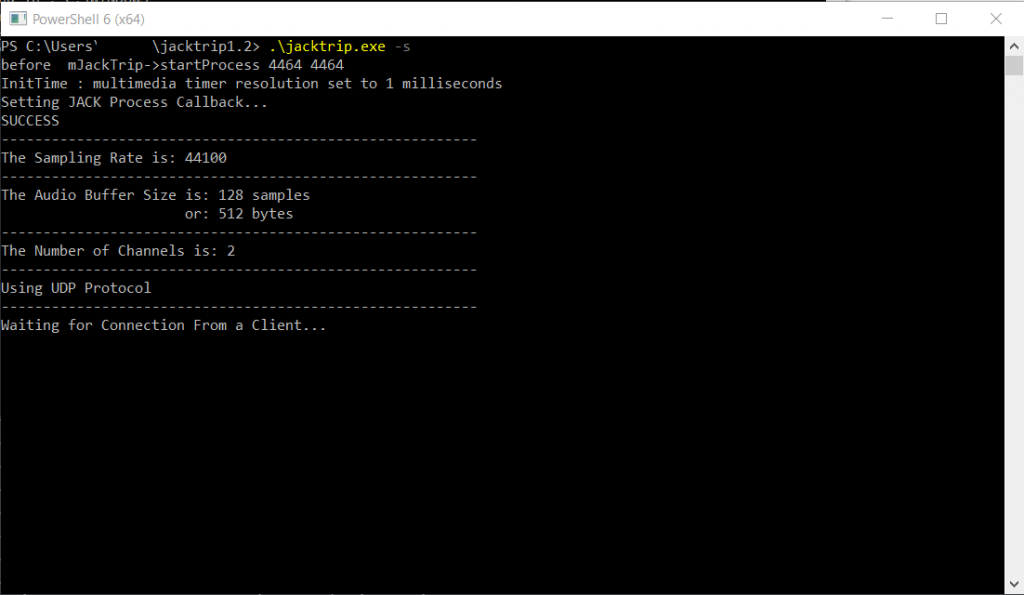
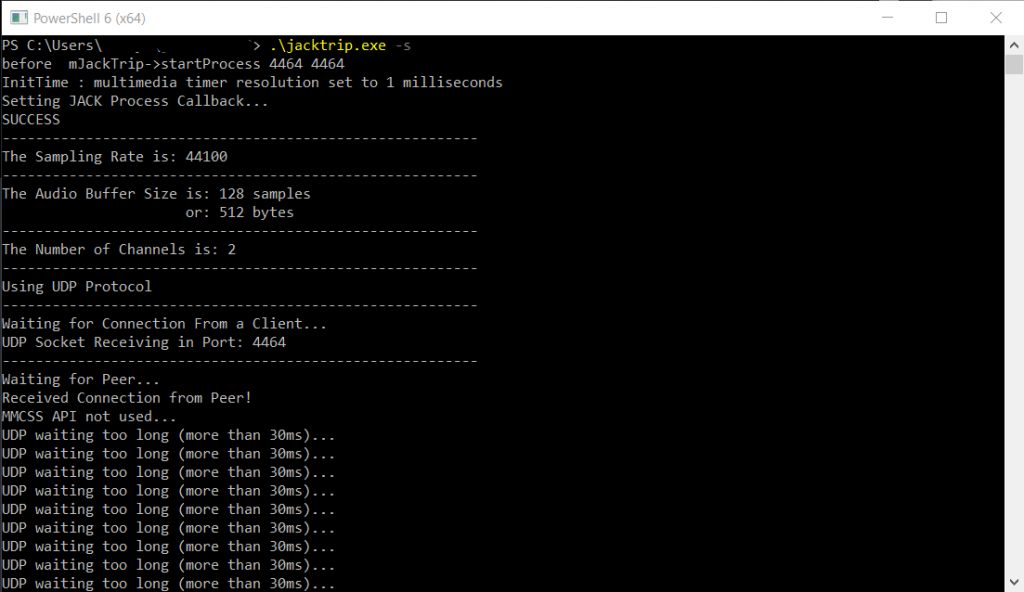
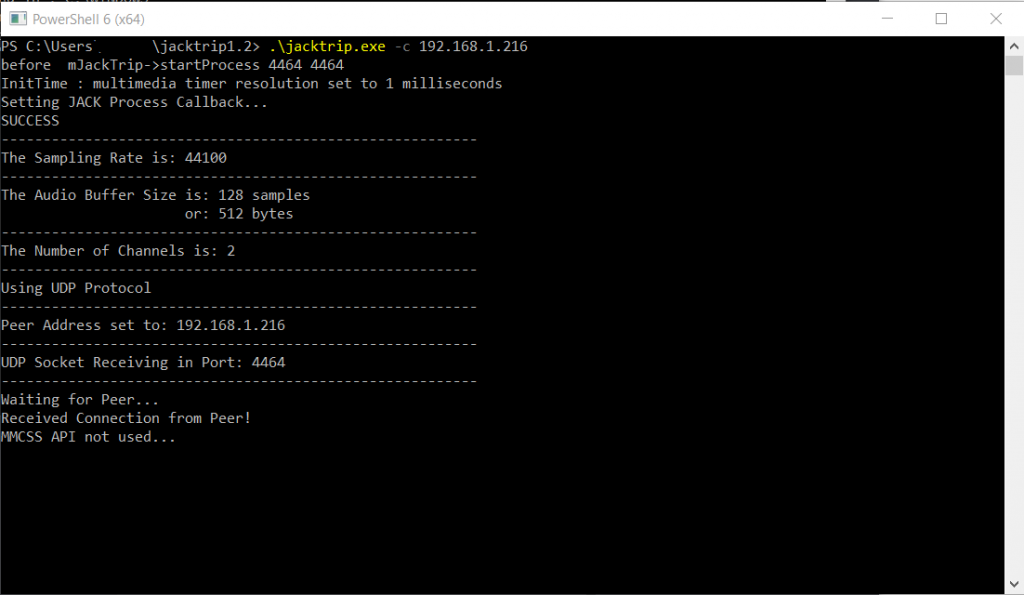
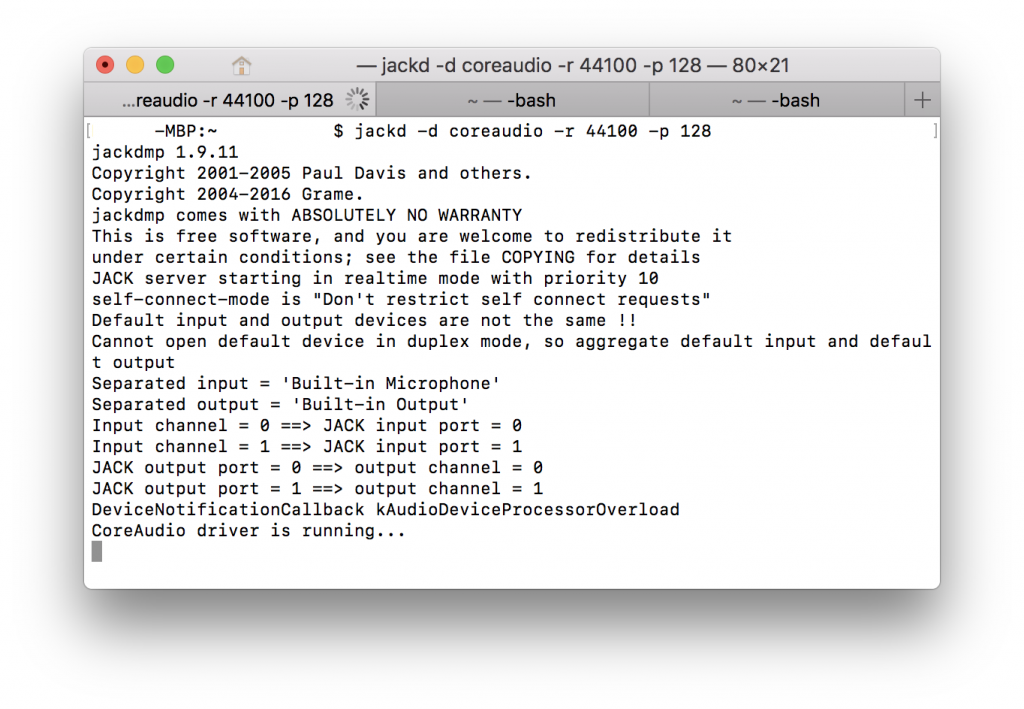
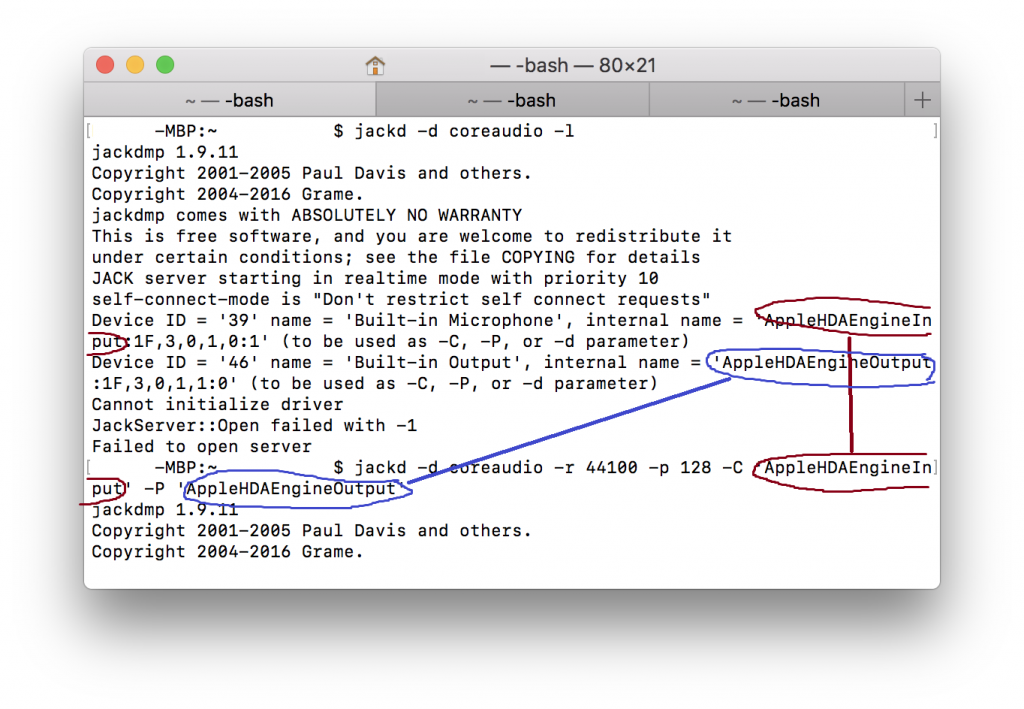
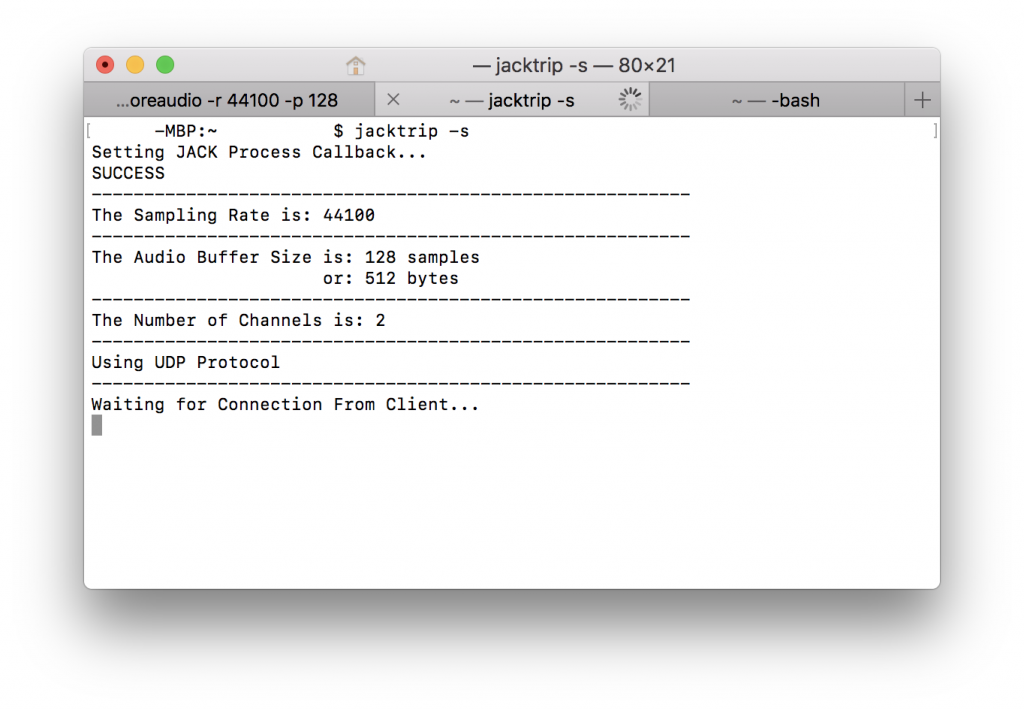
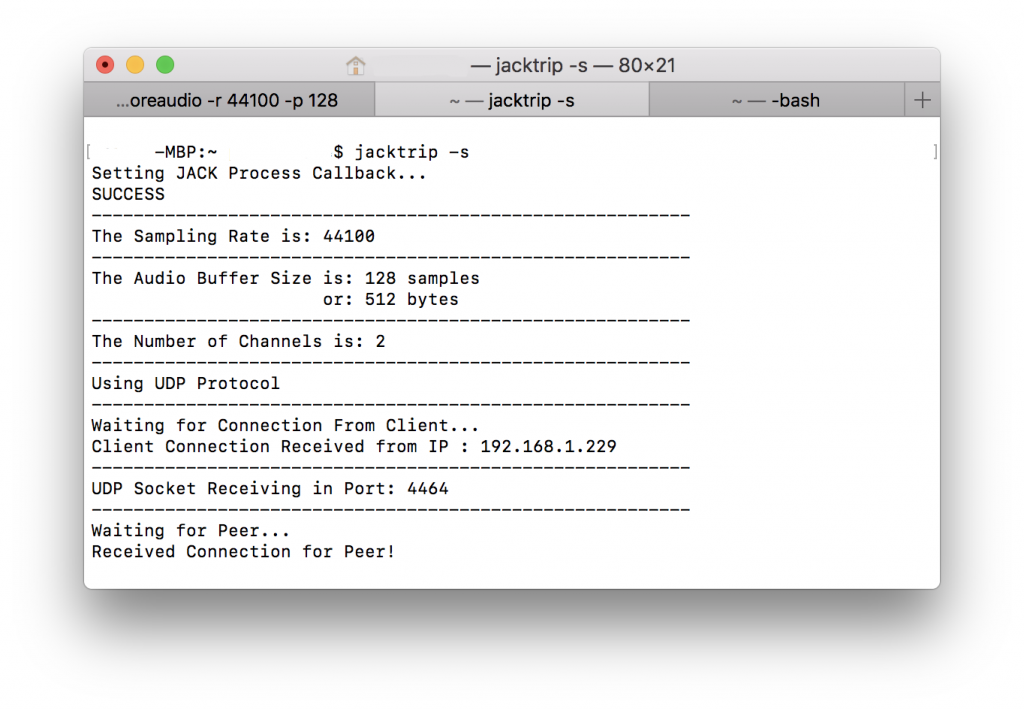
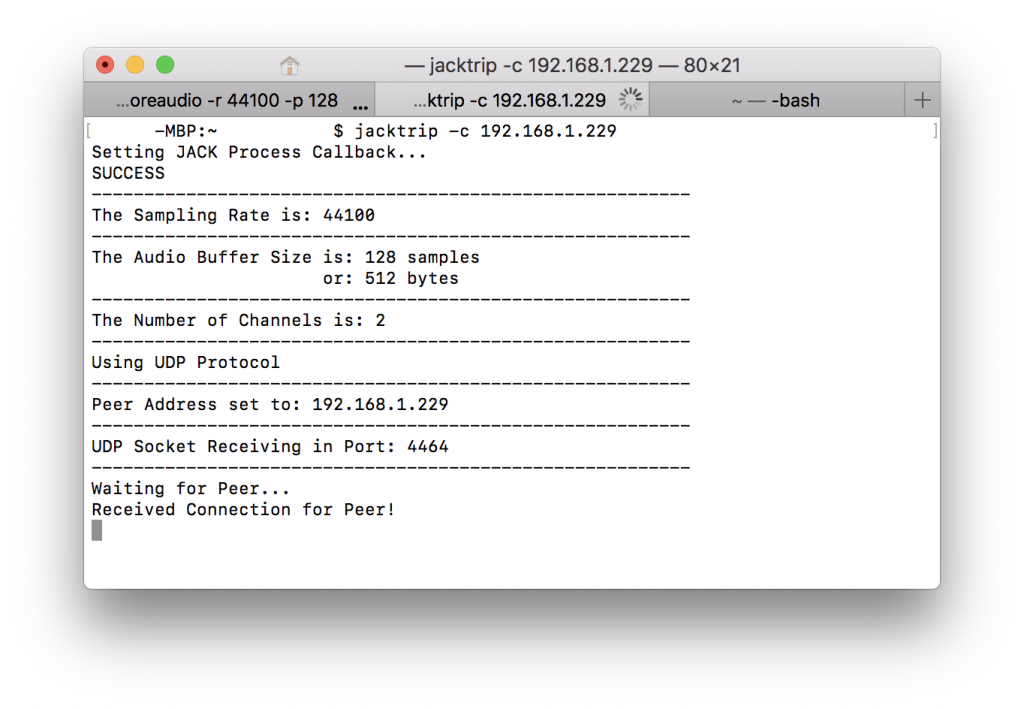
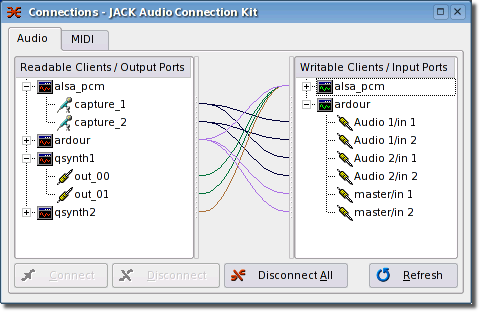
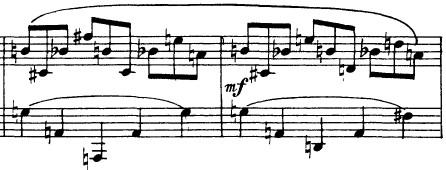
 . So, you can replace any “number” with “natural number” or “positive integer“.
 is always at least divisible by 1 and itself; there can be other factors, but the number itself and 1 must always be factors. (Think prime numbers: they are the least divisible numbers, besides 1, and even they are divisible by one and themselves.)
 is to multiply by
  , then we multiply the two together. Algebraically, the fact that this makes the resulting number a common multiple (ACM — my abbreviation) is obvious. (Note for people who don’t know algebra, when we write two variables right next to each other, we mean that they should be multiplied):
 by
by  that you can divide the ACM by to get the LCM. That means:
 ![\[lcm(x, y) \stackrel{?}{=} \dfrac{acm(x,y)}{d}= \dfrac{xy}{d}\]](https://seanchenpiano.com/pianonotes/wp-content/ql-cache/quicklatex.com-470d694331caa229f019d05f176a108b_l3.png "Rendered by QuickLaTeX.com")
![\[\dfrac{xy}{d} / x = \dfrac{y}{d} \text{ and } \dfrac{xy}{d} / y = \dfrac{x}{d}\]](https://seanchenpiano.com/pianonotes/wp-content/ql-cache/quicklatex.com-68bd2b7e55a124da78eaee3b143f1ca6_l3.png "Rendered by QuickLaTeX.com")
 are both whole numbers, and thus
  must be a divisor/factor of both
 and
and  . You can check for yourself using these examples that the gcd is the largest number that will divide evenly both numbers. Sidenote: numbers that have a GCD of 1 are called coprime numbers.

 . So on the bottom row, let’s write two groups of “123”


 ) in both table versions: