Harmonic Thoughts: Jazzy Twinkle

As you might know, I have two kids now, so much of my musical life revolves around nursery tunes and unfortunate earworms from shows like Daniel Tiger and other viral videos like Baby Shark, although I’d like to give a shout out to Bluey for great music that often incorporates or references classical pieces.

As I was noodling around with “Twinkle twinkle,” I discovered a cool chromatic sequence you can put under the final twinkle statement that conveniently is easy to play on the guitar (just slide down in one barred position), but also sounds pretty cool and jazzy. And we all know a classical pianist’s dream is to sound jazzy.

I wanted to explore from my own viewpoint, unadulterated by formal jazz studies, why this progression works, how we can get there from a “classical” idiom, and maybe even some experiments with even weirder extensions. Keep in mind, I didn’t necessarily consciously take this path to arrive at the progression, but in writing this out, I’m trying to articulate what perhaps goes on subliminally in the ear or fingers.

So let’s start with the end result:

My goal with this was to do a almost fully chromatic line going all the way to the second to last measure, where we do have to jump to the cadence. I did cheat a bit with that dotted note in the base, because otherwise it would be sort of odd. I also think my preference would be to break the chromatic scale starting “how I wonder…” but I had a chromatic agenda here. But, I think it’s cool you can just descend chromatically under the melody and it works!

But first…

II – V – I

Here are some examples of II – V – I progressions.

I think it’s hard to overstate how important a pre-dominant/dominant/tonic motion is, even if it’s on a secondary key. We feel the V – I strongly, but that pre-dominant chord has a lot of harmonic possibilities – A pre-dominant chord can be a ii, IV, V/V; it can be a minor, a major, a minor 7th, a major 7th, a diminished 7th, a half-diminished 7th, and on and on as you stack more 3rds. Importantly, it can also be a Neapolitan or an augmented 6th chord, which you can actually think of as chromatic versions of stacked thirds on top of the ii chord.

The useful thing is that you can II – V – I your way onto practically any chord (I haven’t transcribed it or seen a score, but to me that is how Giant Steps works). I’ve put a short snippet below of just random II – V – I motions (and… uh some that aren’t because I got lost), and it sounds completely fine even though I’m jumping to so many different chords.

Okay, so let’s take a detour.

Pachelbel’s Canon

Ah, yes. We all know this, and we all know it’s maybe related to the circle of fifths. Well, actually, is it? I mean, it has fifth motions (going down a fourth = going up a fifth), but it also moves up a step every other time, right? I think it’s more of moving down a third every two chords, with the in-between chords giving you step-wise (deceptive) cadences. I think this pattern is actually called a romanesca.

But, we can actually maybe turn this progression into a legitimate circle of fifths. Let’s strip it down to the movement by a third I mentioned before, and… let’s edit the last measure so it’s a II not a IV (in D major, instead of G major, we will use e minor).

Now, taking what we figured out in the previous section, let’s just put II – V – I, ending on the four chords we’ve picked out. Just to walk through an example, going into the second measure, we need to arrive at b minor. A ii – V – i cadence would be something like C♯ø7 – F♯ – b.

We can actually make it back to the tonic without breaking the pattern (with a little creative chromaticism).

Has a sort of K-pop feel to it, I think (well, because I used lots of 7ths).

What if we kept going? Another crucial point to realize is that the II – V – I motion puts you down a step. Since we were moving by thirds (two steps) at the most sparse version, and we’ve added one II – V – I before each chord, occupying one step, that leaves us with one more step. Why don’t we make that other step a II – V – I as well?

Okay, so this maybe doesn’t sound as great, but I think with a bit more finessing, could work fine. But, hey! We now legitimately have circle of fifths motion in the bass the whole way through (albeit chromatic and with some slight of hand at the end).

Tritone Substitutions

One thing jazz-wannabe classical pianists learn quite early is TRITONE SUBSTITUTIONS. When you first start off it’s just sort of like, hrm sometimes if I play the chord a tritone away from the original chord, it sounds kind of cool and jazzy. In the following example, the G turns into a Db.

Upon thinking about it some more, it seems to work the best on V – I cadences, because then it turns into ii – I, which is just sliding down a half-step. Something Phrygian about it. So, let’s substitute every “V” in our II – V – I sequences with its tritone version, which sometimes just involves moving the bass note down. With some of them, since we’re already moving by half-steps, it doesn’t work, but we really are able to make it move down chromatically.

Back to Twinkle

So you can actually put circle of fifths under a big chunk of “Twinkle twinkle.” Starting at “Like a diamond in the sky,” you can do circle of fifths alllll the way to the end of the piece:

Well…. now that we have the fifths, we can just tritone substitute to our heart’s content and get the chromatic version we want. Yay!

You know, I think a good mix of fifths and tritone-subs is the way to go. Otherwise it’s too uniform, and if everything is spicy, nothing is spicy. I’ll leave that as an exercise for the reader =).

And Beyond

I was thinking, sometimes we have those half-steps already and we can’t really do a tritone substitution there. What if… to move between the half-steps we use quarter-tones? To be honest, I’m not a huge fan of how it sounds, but it’s definitely interesting, so I leave it here for you to react to. I had to put the quarter-toned pitches on a separate staff because pitch bends apply to the whole instrument, and because of the way the playback works, blah blah blah.

I dunno, maybe has potential? Might have to make some of the other notes in the chords quarter-toned, too.

Semi-Related Thoughts

I like to sing along and harmonize to tunes. I’ve realized that the Schumann/Beethoven “An die ferne geliebte” melody works very well as a counter-melody in many cadences:

If you don’t know the Dohnanyi Nursery Rhyme Variations, I urge you to listen to it. I think it’s a very colorful piece with lots of musical references. At first, it has a pastiche-y feel about it, but I think by the end, you come away feeling that it really is sincere, albeit fun and humorous, music.

If any of you are theorists or jazz experts, and want to chime in on anything about this, please do in the comments! I’d love to hear and learn more about different perspectives on harmony.

Until next time!

Sean


Moving from NGINX to Caddy v2

Motivation

EDIT: I had a misconfiguration that bit me in the ass recently (along with blindly updating Go to 1.17). Code below is updated.

I recently decided to try Caddy v2 for my personal home server, and had such a good and easy time with it that I decided to migrate my website server to Caddy from NGINX. NGINX was doing just fine, fast, and stable. But with the recent addition of a Cloudflare proxy and stuff, I didn’t want to have to deal with certbot and manually dealing with a DNS challenge. And, the prospect of having sane preconfigured behaviors was quite nice, since now with two daughters, I have less and less time to tinker with things like this.

That, and I (with the help of my brothers) had setup NGINX probably five years ago now, and though I still feel like I’m hacking stuff together, back then, it really was quite hacky, so who knows how much bad config was in my NGINX conf file. So if any of you are seasoned webserver sysadmins and are thinking, “what the hell is this config?” I apologize. If you see something egregious or any security vulnerabilities, please shoot me a message/leave a comment and educate me!

So… since I’m on a trip for a concert, I have some time to get this done. I’m happy how easy Caddy is to configure, and you don’t need to write as many lines to config things because it assumes (correctly in my case) defaults for most people running webservers and reverse proxies. Docs are very clear, though getting your intuition from an Apache or NGINX based config to the Caddyfile can be a bit tough.

I’m most impressed with the automatic tls and configuring the wordpress site. Instead of all the certbot stuff and having to run a certbot in systemd or something similar, you can use caddy. I did have a bit of trouble finding how to easily add the DNS challenge plugin, and finally found in the CLI caddy add-package [plugin-package-github-url] so you can add the cloudflare DNS plugin that way. For .php sites, instead of doing all that try_files and fast_cgi stuff, you can just call php_fastcgi directive, and the defaults all work for hosting a wordpress site (and, most .php sites from what I understand). If you need to configure anything, that is all possible.

I’m also in the process of updating a lot of stuff, so these configs will change (haha why is my node code served from /root…?). I also have some redirects that are made in the node express server… Again, why? Who knows. But I’ll clean that up in the future.

Anyways, compare for yourself. They’re not 100% equivalent since I keep messing around with it, and stopped using the hasura container for now, but at least to the end user, everything seems to work as before the change. But, ~160 lines to ~80 lines, around a 50% reduction! YMMV.

NGINX .conf

server {
        root /root/sycpiano;
        index index.php index.html index.htm index.nginx-debian.html;
        server_name seanchenpiano.com www.seanchenpiano.com;

        location ^~ /.well-known/acme-challenge/ {
                root /srv/www/letsencrypt;
                default_type "text/plain";
        }

        location = /.well-known/acme-challenge/ {
                autoindex off;
                return 404;
        }

        location ~ ^/static/scripts/(.*)$ {
                root /srv/www;
                try_files /assets/scripts/$1 =404;
        }

        location ~ ^/static/(.*\.js)$ {
                try_files /web/build/$1 =404;
        }

        location ~ ^/static/(.*)$ {
                root /srv/www;
                try_files /assets/$1 =404;
        }

        location / {
                proxy_pass http://localhost:8080;
                proxy_http_version 1.1;
                proxy_set_header Upgrade $http_upgrade;
                proxy_set_header Connection 'upgrade';
                proxy_set_header Host $host;
                proxy_cache_bypass $http_upgrade;
                http2_push_preload on;
        }

        location /pianonotes {
                root /root;
                try_files $uri $uri/ /pianonotes/index.php?$args;
        }

        location /hasura/ {
                proxy_pass http://localhost:8081/;
                proxy_http_version 1.1;
                proxy_set_header Upgrade $http_upgrade;
                proxy_set_header Connection 'upgrade';
        }

        location ~ \.php {
                root /root;
                include fastcgi.conf;
                fastcgi_intercept_errors on;
                fastcgi_pass unix:/run/php/php7.2-fpm.sock;
                fastcgi_split_path_info ^(.+\.php)(/.+)$;
                fastcgi_index index.php;
                fastcgi_param PATH_INFO $fastcgi_path_info;
                fastcgi_param SCRIPT_FILENAME $document_root$fastcgi_script_name;
        }

        location ~ /\.ht {
                deny all;
        }
        listen [::]:443 ssl http2 default_server; # managed by Certbot
        listen 443 ssl http2 default_server;
        ssl_certificate /etc/letsencrypt/live/seanchenpiano.com/fullchain.pem; # managed by Certbot
        ssl_certificate_key /etc/letsencrypt/live/seanchenpiano.com/privkey.pem; # managed by Certbot
        include /etc/letsencrypt/options-ssl-nginx.conf; # managed by Certbot
        ssl_dhparam /etc/letsencrypt/ssl-dhparams.pem; # managed by Certbot

        if ($scheme != "https") {
                return 301 https://$host$request_uri;
        }
}
server {

        if ($host = www.seanchenpiano.com) {
                return 301 https://$host$request_uri;
        } # managed by Certbot


        if ($host = seanchenpiano.com) {
                return 301 https://$host$request_uri;
        } # managed by Certbot

        listen 80 default_server;
        listen [::]:80 default_server;

        server_name seanchenpiano.com www.seanchenpiano.com;
        return 404; # managed by Certbot
}

server {
        server_name labs.seanchenpiano.com;

        listen 443 ssl http2; # managed by Certbot
        listen [::]:443 ssl http2;
        ssl_certificate /etc/letsencrypt/live/seanchenpiano.com/fullchain.pem; # managed by Certbot
        ssl_certificate_key /etc/letsencrypt/live/seanchenpiano.com/privkey.pem; # managed by Certbot
        include /etc/letsencrypt/options-ssl-nginx.conf; # managed by Certbot
        ssl_dhparam /etc/letsencrypt/ssl-dhparams.pem; # managed by Certbot

        #add_header Strict-Transport-Security "max-age=31536000; includeSubDomains" always;

        root /root/labs;
        index index.html;

        location ^~ /.well-known/acme-challenge/ {
                root /srv/www/letsencrypt;
                default_type "text/plain";
        }

        location = /.well-known/acme-challenge/ {
                autoindex off;
                return 404;
        }

        location / {
                root /root/labs/public/;
                error_log /var/log/nginx/labs.log debug;
                rewrite_log on;
                try_files $uri /index.html =404;
                autoindex off;
        }
}

server {
        listen 80;
        listen [::]:80;

        if ($host = labs.seanchenpiano.com) {
                return 301 https://$host$request_uri;
        } # managed by Certbot

        server_name labs.seanchenpiano.com;
        return 404; # managed by Certbot
}

Caddy v2 Caddyfile

(dns_cloudflare) {
        tls {
                issuer acme {
                        disable_tlsalpn_challenge
                        dns cloudflare [REDACTED]
                }
                issuer zerossl {
                        disable_tlsalpn_challenge
                        dns cloudflare [REDACTED]
                }
        }
}

seanchenpiano.com {
        # Set this path to your site's directory.
        encode zstd gzip
        import dns_cloudflare
        header Strict-Transport-Security "max-age=31536000; includeSubDomains"
        handle /static/scripts/* {
                root * /srv/www
                file_server
        }

        handle_path /static/* {
                handle_path /scripts/* {
                        root * /srv/www/assets/scripts
                        file_server
                }
                handle {
                        @js path *.js
                        root @js /root/sycpiano/web/build
                        root * /srv/www/assets
                        file_server
                }
        }

        handle_path /pianonotes {
                redir https://seanchenpiano.com/pianonotes/
        }

        handle_path /pianonotes/* {
                root * /root/pianonotes
                php_fastcgi unix//run/php/php7.2-fpm.sock {
                        root /root/pianonotes
                }
                @ht {
                        path *.htaccess
                        path *.htpasswd
                }
                error @ht "Unauthorized" 403
                file_server
        }

        handle {
                reverse_proxy localhost:8080
        }

        log {
                output file /var/log/caddy/seanchenpiano.log
        }
}

www.seanchenpiano.com {
        import dns_cloudflare
        redir https://seanchenpiano.com{uri} permanent
}

labs.seanchenpiano.com {
        encode zstd gzip
        import dns_cloudflare
        root * /root/labs/public
        log {
                output file /var/log/caddy/labs.log
        }
        try_files {uri} index.html
        file_server
}

JackTrip – The Modern-Day Paper Cup Phone

Post updated 5/24: Added information about repeating the process later

What is JackTrip?

The people best equipped to tell you about JackTrip are the creators at Stanford University: https://ccrma.stanford.edu/docs/common/JackTrip.html

But basically, the title is pretty apropos. JackTrip allows you to make a (relatively) direct connection between users
without the overhead of middlemen servers or special processing.

JackTrip runs on top of JACK, which stands for Jack Audio Connection Kit. What JACK does, among other things, is to
allow you to pipe audio around different software.

*Warning* For best results don’t do this with WiFi. It might work, but it might buzz a lot, and
then you have to increase the latency, which makes it less instantaneous.

Less dire warning: This post has a lot of information to understand if you’re just reading it, but I promise if you go
through and follow it step by step, you won’t have any problems. And it’s mostly repeated twice for differences between
Windows and Mac.

Table of Contents

Before you read on, even though Important Notes are at the end, I would read through them first,
ignoring things you don’t understand, but keeping in mind things you do.

  1. Open UDP port 4464 (if Hosting)
  2. Install Jack and JackTrip: Windows | Mac OSX
  3. Start Jack Server: Windows | Mac OSX
  4. Start/Connect JackTrip: Windows | Mac OSX
  5. Profit
  6. Important Notes

Get Set Up

If you’re hosting, then read this part. If you’re running the client, you can skip to “Installing Jack.” It doesn’t really matter who’s server and who’s client, but one person
has to be the server, preferably the one who knows how to forward their firewall ports.

Opening Ports and Finding Public IP: Hosts Only

JackTrip by default uses UDP port 4464 for quick communication. If you know what this means and how to get your ports
open, skip this section. If not, read on.

This is the most difficult section to write, because opening ports depends on what router, internet provider, and
operating system you have. The unfortunate thing is that this means you probably won’t be able to JackTrip behind a
school or office network.

Finding your local IP and Gateway address

You’re most likely behind a router. You’ll need to find both the local IP address of your computer and of the router.
We’re looking for IP addresses that are in the range of

  • 192.168.0.0 to 192.168.255.255
  • 172.16.0.0 to 172.31.255.255
  • 10.0.0.0 to 10.255.255.255

Yours is most likely in the first range.

I’m giving you two different ways to check on each OS. If you’ve never used cmd or terminal before, I suggest you
try it.

Method Windows Mac
Cmd/Terminal Right-click on the start menu (or press Win-X) and click on “Command Prompt”. In the
window that pops up, type ipconfig and press enter.

Look for the longest section, and look for IPv4 Address and Default Gateway. Write those down.

In spotlight search (the search icon in the top right) type Terminal and press enter.
In the window that appears, type IP: ifconfig | grep inet and press enter.
Look for “inet 192.168.X.X”

Gateway: in the Terminal, type
netstat -r | grep default and Enter

GUI On the bottom menu bar, right click the network icon (either a WiFi symbol or a connected monitor
symbol), and click on “Open Network & Settings”. Then click on “View your network properties”
and look for “IPv4 address” and “Default gateway”.
Click on the WiFi icon in the top bar, click “Advanced” near the bottom, then click on “TCP/IP” tab.
Write down “IPv4 Address” and “Router”.

For reference, IPv4 addresses are most commonly 192.168.X.X. The router or default gateway (same thing) usually
occupies a low address in this range, so 192.168.1.1 or something, whereas your computer’s local IP might be
something like 192.168.1.135.

Accessing the Router Administration Interface

If you’ve never logged into your router’s administration panel, this is a good time to try it. Go to your browser
and type in the router address into the address bar and press enter. With any luck, you’ll be greeted with a log-in.
A sure bet is user: admin, pass: admin, but you might look on the sticker of your router
to see if the credentials are there.

To find the page where we can open/forward ports, you should look for menus that are something like:

Network -> Security/Firewall -> Port Forwarding

In the Port Forwarding section, you will be able to open ports – you tell it what protocol to use: TCP, UDP, or both
– in this case UDP, what port number – in this case 4464, and the computer to forward it to – in this case, they
usually have a dropdown list, so look for your IP address that we found in the previous part. Apply the changes, and
we should be good to go.

I’ve consolidated a list of guides for different ISPs and routers, in case you need more specific guidance:

Google Fiber: https://support.google.com/fiber/answer/4650342

AT&T Uverse: https://www.att.com/support/article/u-verse-high-speed-internet/KM1123072/

Xfinity: https://www.xfinity.com/support/articles/port-forwarding-xfinity-wireless-gateway

Linksys Routers: https://www.linksys.com/us/support-article?articleNum=136711

Netgear: https://kb.netgear.com/24290/How-do-I-add-a-custom-port-forwarding-service-on-my-Nighthawk-router

In general, you can Google “port forwarding” and then your device or ISP.

Public IP

Go to https://api.ipify.org/ in your
browser and copy down the address. This is what you will give your clients for them to connect to you.

From here, go to the section for your operating system: Windows | Mac OSX

Windows

You can follow this guide: https://ccrma.stanford.edu/software/jacktrip/windows/index.html
but I couldn’t get it to work using Jack Control, so I’ve written what worked for me.

Helpful Prereq: Install ASIO4ALL

Download and install from here: http://www.asio4all.org/

Install JACK2

  1. Download the JACK2 installer: https://jackaudio.org/downloads/#windows
    1. Select the correct bit version. To check, in your start menu type “System
      Information”, and then look for the entry “System Type” – if it says x64, then I would install both
      the 32 bit and 64 bit versions. If it says x86, then you can only install the 32 bit version.
  2. Double click the downloaded file to install JACK2.
  3. Reboot computer if it asks after installation.

Install JackTrip

  1. Download the JackTrip: https://ccrma.stanford.edu/software/jacktrip/windows/Jack_v1.9.10_64_setup.exe
  2. Double click to install, and use default settings.

Start JACK Server

Here’s where I differ from the previously referenced page. We’re going to run the server from the command line.

  1. Right-click on the start menu (or press Win-X) and click on “Command Prompt”.
  2. If you installed the 64-bit version earlier, type cd 'C:\Program Files (x86)\Jack\', otherwise,
    type cd 'C:\Program Files\Jack\'. cd is a command that stands for “change
    directory.”
  3. Then, type .\jackd.exe -d portaudio -r 44100 -p 128 -d "ASIO::ASIO4ALL v2" and press enter.

You will then see a bunch of output, but if it doesn’t say “Failed to start Jack” or something along those lines,
then you are good to continue. This is what my window looks like:

Check that your audio devices are correct in ASIO4All

  1. Find the notification area:
  2. Click on the ASIO4ALL icon (if you followed the above command, it should say “128 Samples @44100 Hz”
    instead):

  3. Make sure the devices that you want to use are selected. I want to use Realtek HD Audio, so it is selected.
    Adjust as appropriate. I also moved the slider on the bottom to where the blue line is to correspond with
    the 128 samples we choose. 
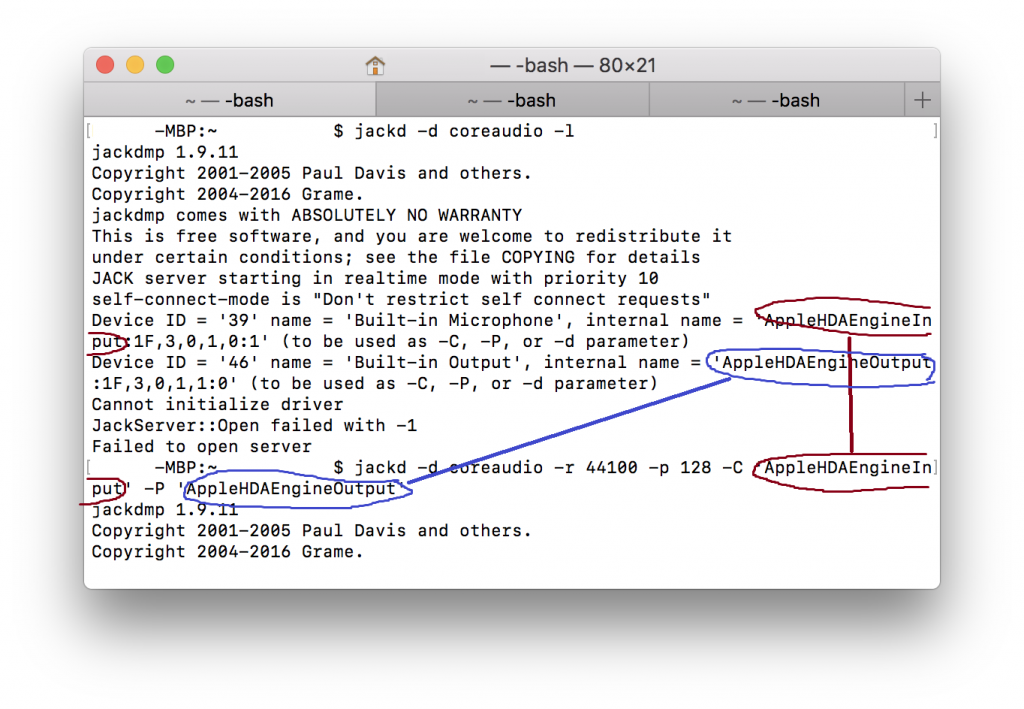
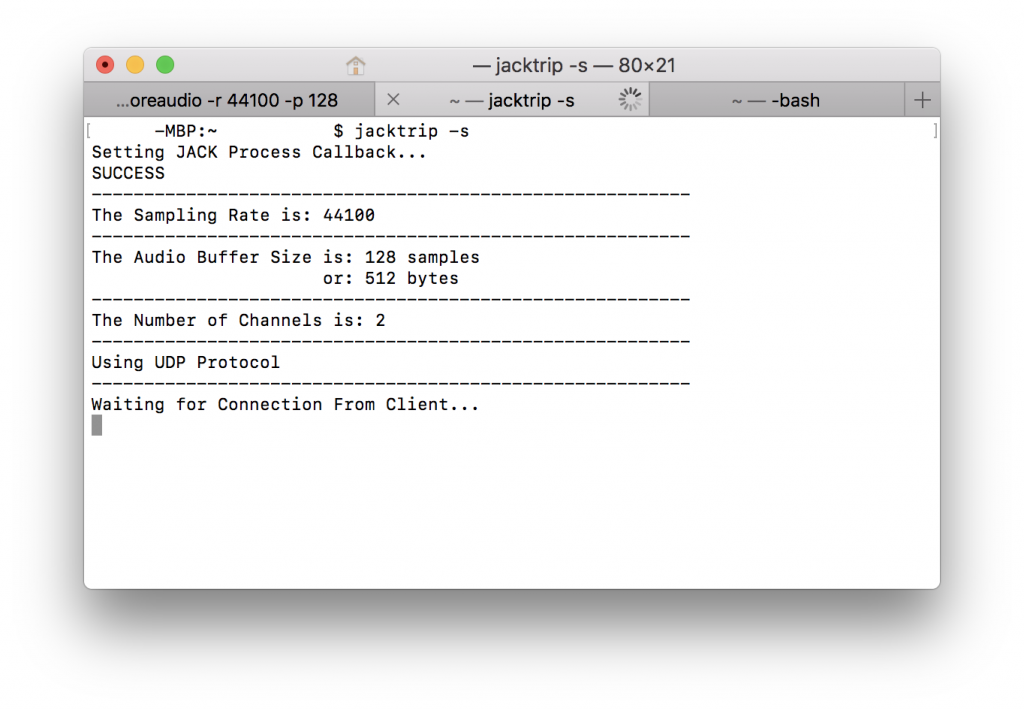
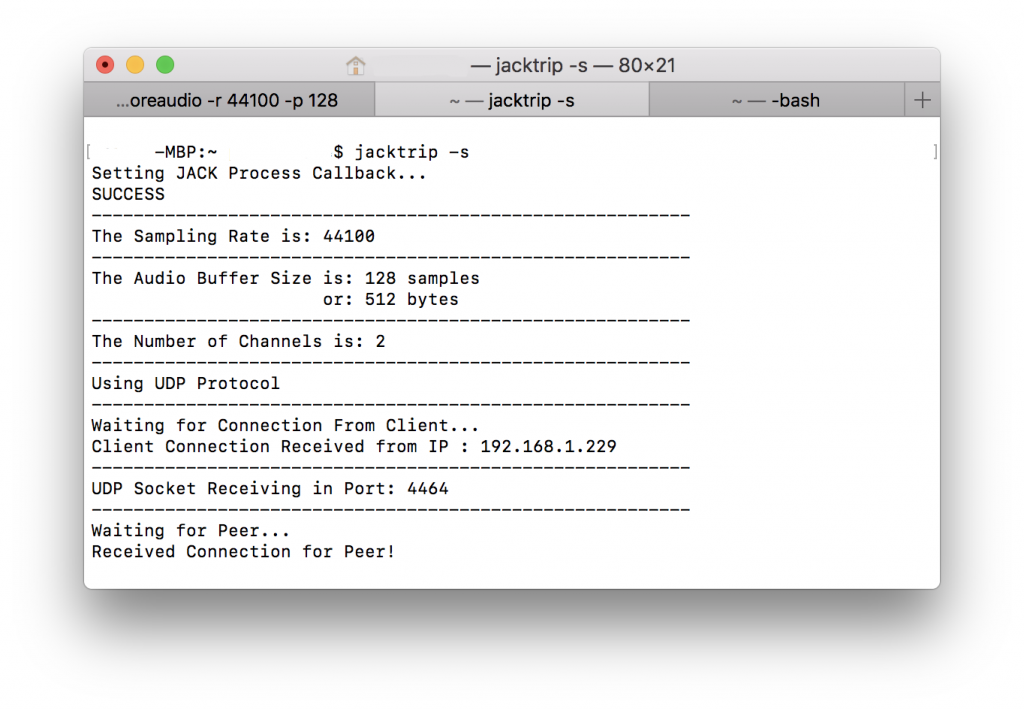
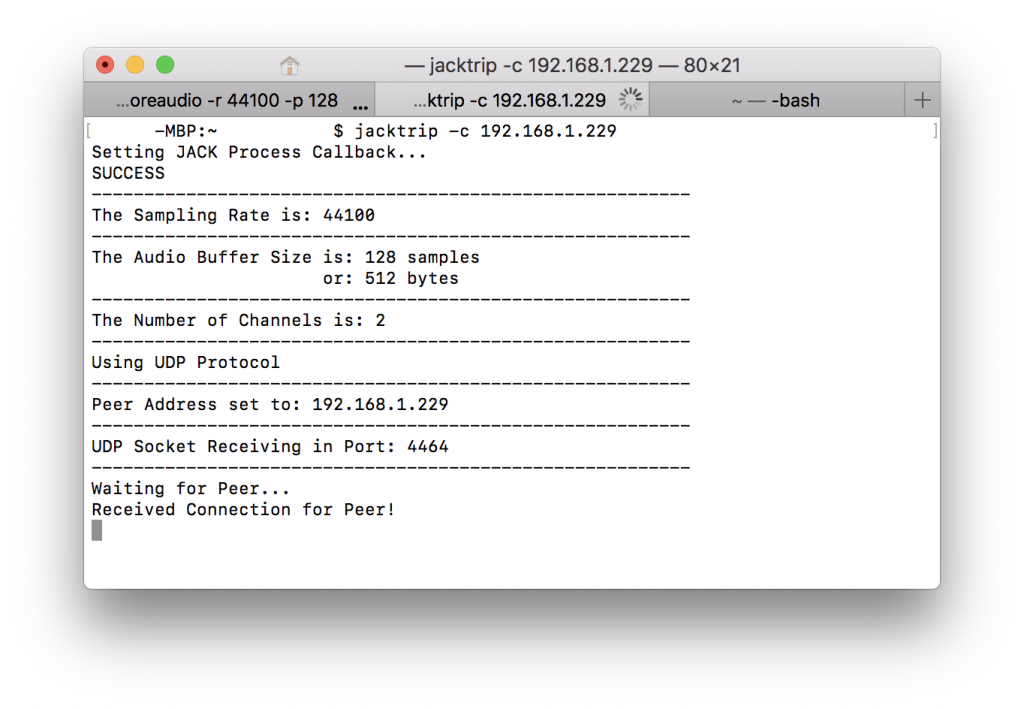
Note that, if you switch audio
    devices, you might have to close the window and restart JACK. To do that, go to your command window and type
    Ctrl C (as if you were copying something) which will stop the Jack server.
    Then do the previous section over. Another pro-tip is that you can press the Up Arrow Key
    repetitively to cycle through your previous commands, so you don’t have to retype it. Just press enter.

Run JackTrip

  1. Open another command window, as above (don’t close that one).
  2. This time, ‘cd’ to the JackTrip installation location. So for mine, it would be
    cd C:\Users\USERNAME\jacktrip1.2 where USERNAME is my username, and the 1.2 after jacktrip
    could be different in the future. A pro-tip is just to type all the way up until “jacktrip” and then
    press the Tab key; the command line will auto-complete the folder name for you.

For Hosts (must run this first before client):

  1. Type .\jacktrip.exe -s

This is what mine looks like:
When the client successfully connects, you’ll see this:

Because I’m bad and a hypocrite, I used WiFi… so you see the UDP waiting too long warnings. No worries, it
works.

For Clients (must wait for host to run first):

  1. Type .\jacktrip.exe -c IP_ADDRESS

IP_ADDRESS is what your host will give you (the one the he or she should have looked up if they followed the Open Ports section. Note that I am using a local IP address because I’m connecting
within my network for demo purposes, but the number you put in will most definitely NOT be 192.168.X.X. You
should see a bunch of stuff, but important to see is “Received Connection for Peer!”

At this point, you should be all connected and ready to do virtually-lagless audio communication! From here, see
the Notes section for tips and warnings. Once you’re done with your jam sesh, stop
everything by going to each command window and pressing Ctrl C (as if you were copying something).
This kills the process, and you can close the windows.

Mac OSX

You can follow this guide: https://ccrma.stanford.edu/software/jacktrip/osx/index.html
but I couldn’t get it to work using Jack Control, so I’ve written what worked for me.

Install JACK2

  1. Download the JACK2 installer: https://jackaudio.org/downloads/#os-x
    1. Download the JACK2 Binaries link (JackOSX 0.92_b3 as of this writing).
  2. Because of some Mac OSX security thing, you have to install this by going to Finder, the downloads
    folder, Ctrl-click on the .pkg file, and then click “Open”. Then you can install it.
  3. Reboot computer if it asks after installation.

Install JackTrip

  1. Download the JackTrip: https://ccrma.stanford.edu/software/jacktrip/osx/JackTrip.pkg
  2. Same as above, go to downloads folder in Finder, Ctrl-click and click “Open”.
  3. Shouldn’t need to reboot, but do it if it asks.

Start JACK Server

Here’s where I differ from the previously referenced page. We’re going to run the server from the command
line.

  1. Open Terminal. If you don’t know where to find it, go to Spotlight search (search icon on the top bar)
    and type “Terminal”, then Enter.
  2. A little user-interface change I like to do is enable visible tab bar on Terminal: On the top click on
    View -> Show tab bar.
  3. Go back to the Terminal window and type jackd -d coreaudio -r 44100 -p 128 and press enter.

You will then see a bunch of output, but if it doesn’t say “Failed to start Jack” or something along those
lines, then you are good to continue. This is what my window looks like:

[Optional] If you want to use non-default devices, you’ll have to specify them with -C and -P at the end. To
show what devices exist, use jackd -d coreaudio -l. You’ll see for each entry something that says
“internal name.” Don’t worry about the “Failed to open server” because in this case that’s what we wanted – just
to list the devices but not start the server. Now that we know the internal names of the devices, we can put the
input after -C, and output after -P:
jackd -d coreaudio -r 44100 -p 128 -C "InputDeviceName" -P "OutputDeviceName"
See the next image for sample of what I have.

Run JackTrip

  1. In Terminal, open a new Tab either by Ctrl-T or clicking the plus in the tab bar.
  2. For Hosts (must run this first before client):

    1. Type jacktrip.exe -s

    This is what mine looks like:
    When the client successfully connects, you’ll see this:

    You might see UDP waiting too long warnings. No worries, it works.

    For Clients (must wait for host to run first):

    1. Type jacktrip.exe -c IP_ADDRESS

    IP_ADDRESS is what your host will give you (the one the he or she should have looked up if they followed the
    Open Ports section. Note that I am using a local IP address because I’m connecting
    within my network for demo purposes, but the number you put in will most definitely NOT be 192.168.X.X. You
    should see a bunch of stuff, but important to see is “Received Connection for Peer!”

    At this point, you should be all connected and ready to do virtually-lagless audio communication! From here,
    see the Notes section for tips and warnings. Once you’re done with your jam sesh, stop
    everything by going to each command window and pressing Ctrl C (as if you were
    copying something). This kills the process, and you can close the windows.

Notes

  • I don’t think it needs to be said, but I’ll mention it anyways: after you’ve got it working once,
    all you need to do for the next time is to run JACK and JackTrip – no need to reinstall everything.
  • All parties must use the same sample rate (-r) and buffer size (-p) parameters, or else JackTrip
    will fail to connect!!
  • Use headphones! Because there isn’t any sound processing, there’s no noise- or echo-cancellation.
    Using it without headphones, however, is a good way to see how good the latency is, since you can
    hear your own echo from the other person’s speakers.
  • Ctrl C on both Windows and Mac stops the program. Sometimes, you need to spam it. If
    one person does Ctrl C on their Jack Server, everything will start buzzing, so just
    mash Ctrl C when you hear incessant buzzing.
  • To save your sanity, most command lines have some nice features:

    • Pressing Arrow Up Key goes back in time through your command history. So, if
      you want to edit your previous command, press Up, and then start deleting/typing.
      Arrow Down Key goes forward in time, up until the current time, duh.
    • If you’re not quite sure if you’re typing the correct path to some folder or file, you can
      always press Tab to cycle through auto-complete. For example, in the Windows example, you
      can type cd C:\Progr and then press Tab, and it should automatically fill in
      cd 'C:\Program Files\'
  • I chose the jackd parameters from experience; a 128 buffer size had latency that was barely
    perceptible. If you can sort of hear the other person, but there’s quite a bit of buzzing noise on
    top of it, then you might need to increase your latency. In the jackd command, instead of
    -r 44100 -p 128 try -r 44100 -p 256. Then restart JackTrip as well. Again,
    all parties involved need to be using the same -r (sample rate) and -p (buffer size).
  • DON’T USE WIFI. Locally, with Betty’s Macbook on WiFi, and my computer on ethernet, we could do -p
    256, but the latency isn’t as good, and you won’t have as good of an experience.
  • On Windows, you might run into an error starting up certain audio programs after you
    install JACK2.

    There’s some critical bug that hasn’t been fixed. For example, my Sibelius
    software crashed upon opening every time. There is a workaround, and involves disabling Address
    Space Layout Randomization. It’s a small security decrease, but it’ll prevent your audio
    applications from crashing. If you want to read about the bug, go here: https://github.com/jackaudio/jack2/issues/332. Otherwise, to fix
    it:

    1. Go to your start menu, and type “Windows Security” and launch the app.
    2. Then go to “App & browser control” and then scroll down to “Exploit Protection”. Click on
      “Exploit protection settings”.
    3. Go down to to “Randomized memory allocations (Bottom-up ASLR)” and change it to “Off by
      default”.
    4. You might have to restart. Everything should work now.
  • In case you want to pipe audio around to, for example, record all the audio streams, the easiest way
    would be to use qjackctl (type in Spotlight or Windows Start Menu – the program is called Jack
    Control, but qjackctl also brings it up) after you’ve connected JackTrip between host and clients
    and opened up whatever software you need to use (OBS, Reaper, etc.). Click on the “Connect” button,
    and you’ll see the connections window. You can drag inputs from the left side to outputs on the
    right side. This will require some experimentation on your part, because I won’t be able to cover
    all the cases. Here’s an image from QJackCtl’s screenshot page:

Hopefully this has been helpful. It’s a lot to parse if you’re just reading it, but I promise if you go
through and follow it step by step, you won’t have any problems. I hope this can allow many more
musicians to collaborate, especially realtime, because, let’s face it, syncing audio and video or
recording with yourself is fun and all, but it’s a pain in the butt. Happy Music Making!

If you found this post helpful, please consider donating! https://www.paypal.me/seanchenpiano

Date with an Orchestra

Today, we’re going to be going through a few tips that I have picked up and figured out throughout my time playing in front of an orchestra. It also helps that I have been with someone for a long time who plays in an orchestra. As with performing recitals and auditions, the best and most effective way to learn how to be the best soloist you can be in front of an orchestra is by doing it over and over again. There simply is no better way. However, I hope some of these suggestions can help accelerate that process. If you have any other tips, please leave them in the comments!

Preparation

Get the Full Score

As you might gather from a previous post, I’m a big fan of having different sources for my information. Having the full score helps you be informed of what’s going on in the orchestra part, more so than having a piano reduction, though the latter might be easier to read. Not only does the full score allow you to see what instruments are playing what, it also allows you to double check the notes and dynamics in your reduced score. You can also work on your score reading!

Listen

This sounds simple and obvious, but listening to recordings helps! That way you know your entrances, and you know what the orchestral part sounds like, as opposed to only hearing a second piano reduction. This offers yet another way to check your notes. If you hear something funny or fishy, check your score – maybe the recording has a mistake, but more often than not, you might discover that you’ve misread some notes or rhythms.

Play Along

I like to play along with a recording of the concerto, preferably with headphones. Knowing not only how the orchestra part sounds, but also how it sounds like while you are playing your part is very helpful, since the difference in timbre between instruments can throw you off. For example, a certain melody might sound clear in the piano reduction, but when you listen to the recording (or show up to rehearsal) you realize that it’s actually not as easy to discern within the context of the rest of the orchestra. Or, some rhythms might be very disorienting (see the 5th page of reduction for Rachmaninoff’s Third concerto – the offbeats in the winds are really confusing).

Conduct

Sometimes, it’s very useful to conduct yourself, away from the piano, or even with a recording. It gives you a good sense of timing, and you get to familiarize yourself and internalize any interesting meter changes. You don’t want leave any of your counting and synchronization solely to “I just feel it,” or “I just go by how it sounds.” Yes you should feel it, and know how it sounds, but we want no excuses!

Sing Along

I find it very, very helpful to sing certain important parts while playing through the concerto. For example, in the second iteration of the first theme of Rachmaninoff’s 3rd (the third and fourth pages, if anyone is looking), the piano has accompanying figures, and I like to sing the main melody while playing through it. It allows you to get the entire picture in your ear, keeps yourself from rushing or slowing down, and makes sure you don’t get confused in phrases where the piano begins with a sixteenth-note rest. You can also figure out what sort of timing you might have to take when you are accompanying a solo wind melody or something similar.

I sang along a lot while learning Bartok’s second concerto – I needed to make sure I knew what to listen for, and not have anything catch me off-guard in terms of rhythm or number of repetitions of certain accompaniment figures.

Learn the patterns

This seems elementary, but all musicians should learn the different conducting patterns. You don’t want to look up from the piano, and not know what beat the conductor is on because you’re not familiar with the patterns.

Knowledge

There are certain infamous parts of pieces, where you must utilize all of the above techniques to make sure you have that section down pat. One of these is in the twenty-second variation of Rachmaninoff’s Paganini Rhapsody, 7 before rehearsal marking 65 – this section has piano runs accompanying a melody in the strings. Jerry Lowenthal told me I had to learn the orchestra tune by heart here and how the piano part fits in, because just relying on feeling can be iffy and scary, especially on stage. I would also advocate conducting this passage to know which beats the phrases begin and end on, because they shift around each successive phrase. So, an example of the “facts” I would tell myself are:

1st Phrase – starts after second beat, peaks on the downbeat of the next measure

2nd Phrase – starts on the second beat, again peaks on the downbeat of the next measure, just like the first phrase, but the run goes on for a beat longer up to the second beat.

3rd Phrase – starts right before the third beat, and peaks on the third beat of the following measure, and the run goes on for even longer, going up to the third beat

4th Phrase – starts only one triplet-eighth after the previous phrase, peaks again on the 3rd beat.

5th Phrase – I would say this one is a “normal phrase” since it starts after the downbeat, and the phrase lasts exactly two bars.

*N.B. when I say “beat” here, I mean in terms of quarter notes. This variation is actually in alla breve.

This enumeration makes the passage even more solid in your head. Knowing these things can help you when you’re not quite clear, and especially when on stage things become a bit unclear and uncertain, either because of how it sounds on stage or because of your nerves.

Tips for the First Date

Wait a bit…

The first thing one learns about playing in front of the orchestra is that they are almost always behind the conductor. No, it’s not that they or the conductor are incorrect, it’s just how orchestras function. First, the plane of the beats is not at the bottom of the conducting motion, but somewhere in the middle after the rebound. Second, there is always a delay in reaction, and so most orchestras naturally have that built in so that people know where their colleagues are going to play.

So, as soloists, we have to account for that, very notably in something like the opening of the Grieg Concerto, or in any final chord of a piece. Furthermore, if we want to land on a chord together at a certain time, we sometimes compensate for that by possibly giving an earlier cue (sometimes that’s not possible), or just waiting a hair before getting to the arrival point.

…but don’t wait too much

At the same time, you have to trust the conductor to follow you, and just do your thing. It’s actually very easy to be too adjustable, and you end up getting slower and slower because you’re trying to accommodate being with the orchestra. (I find this is something that I need to tell myself quite frequently).

The Concertmaster is your best friend

No, not literally, unless of course he or she in fact is. What I mean is that the concertmaster is your window into the orchestra. Sure, you can watch the conductor, and you should. But oftentimes it can be a lot easier to line up with the group if you watch the concertmaster instead. This can include playing with pizzicati (seriously, try this next time) – if the conductor just conducts the group without worrying about you, and you just watch the concertmaster, I guarantee it will be more together than if the conductor tries to follow the soloist; or with any big chords.

Furthermore, the concertmaster is probably the musician in the orchestra that hears the soloist the best, and can see you out of the corner of his or her eye. That means that they are able to pick up on any subtle (or not-so-subtle) rhythmic nodding or accents (for stability of course), or if you are wanting to change the tempo. And the soloist hears the concertmaster quite clearly as well, so that’s another reference for being together with the group (assuming the rest of the group is with the concertmaster).

Adjust your dynamics

The reality of playing with orchestras and in halls that are big enough for an orchestra is that we as soloists need to project more (play louder) than we are used to by ourselves in the practice room. This is especially true when the orchestration is thick or in a register that covers the piano. Conversely, in solo passages, then we can utilize the full dynamic range of the piano, especially the softer parts. Just be aware of chamber-like passages where you might be prone to covering up the solo instruments.

Eye contact

It’s nice to occasionally look up at the conductor; eye contact allows you to synchronize rhythmically and musically. Furthermore, if there is a duet between the soloist and a solo part in the orchestra, having that direct connection can help with the ensemble and the expression.

Before, I talked about following the concertmaster for pizzes, but another useful tip is to watch the cello and bass players (if they’re in your line of sight) especially to sync up the left hand with them – many times you don’t have the time or luxury to look over at the concertmaster.

Respect the Protocol

I’ve really never heard this brought up except by my teacher Edward Francis, but the etiquette for entering and exiting the stage is important. On entrance, first shake the concertmaster’s hand, then take the bow (no pun intended). After the concert, shake the conductor’s hand (they might even give you a hug), the concertmaster’s, then take your bow.

Check with the orchestra people whether an encore is okay. Depending on the length of the concert and/or encore, they might not want you to play – if the orchestra is unionized, they could go into overtime, and then have to deal with financial issues. This could be a problem especially for smaller orchestras, so just be aware of that.


Hopefully all of these things can help make playing in front of an orchestra less stressful. Once you know what to expect, it’s not bad. In fact, playing in front of an orchestra is one of the most thrilling experiences I know of. I think it really is a unique experience to solo musicians; in no other field do you get to take part in such a collaboration and dialog to bring amazing masterpieces to life.